
Seguro tags communicate with NFC (Near Field Communication), which is a technology available on all smartphones, and utilizes the same hardware used for smartphone payments.
Make sure your phone is unlocked, then hold the tag next to the back of the phone. For iPhones, the NFC reader is at the top, near the camera lens. For Android phones, it's usually in the middle of the phone.
Your phone will vibrate (and beep, if it's not on silent), and the tag's LED will flash green three times. On iPhones, a notification will appear at the top of the screen. Tap that to open the Seguro web app. On Android phones, you may need to confirm that you want to open the Seguro web app.
Everything you need to do with Seguro can be done through the web app; there's no requirement to download the native app. That being said, the native app (iPhone or Android) does give a cleaner, snappier experience, so many users perfer it.
After opening the web app, tap the "hamburger" menu icon in the top-left corner. It's the one with three horizontal lines. The first menu item is "Get the App...". Tap that item, and you'll be taken to the Apple App Store or the Android Play Store, depending on your phone.
After downloading the app, you'll need to tap the tag again to view the tag data in the native app.
To receive email notifications and view recordings on other devices, you'll need to create an account. It's free, of course, and easy to do.
In either the native or web app, tap LOGIN in thetop right corner of the screen.
You can authenticate with your Google or Apple ID, but we suggest creating an account with username and password, to avoid confusion. Note that the three login methods (username/password, Google, and Apple) are all independent, and if you use more than one, you won't be able to access recording data across them.
Tap "Sign up", then enter your email address and tap the Continue button. Enter a password, and tap Continue again.
You'll return to the app automatically, and after a few seconds, the LOGIN button will change to a colored avatar circle to indicate you're logged in.
You'll receive an email at the address you registered with to confirm the email. It's important that you click the confirm link, because only confirmed emails can be set up for notifications.
You can configure the Seguro platform to automatically send you notifications through email. One set up, notifications will be sent when
To configure notifications, either tap "Settings" in the top-left hamburger menu, or the gear icon in the bottom tab bar. Scroll to the bottom, to the "Notifying Me" section.
Enable notifications by toggling the "Send email to..." switch to ON.
To disable notifications in the cases where you're the recipient, check the "Don't send if I finished the recording" checkbox.
To filter out recordings that don't have excursions, check the"Only send recordings with excursions" box.
You can choose the language that the report is sent. The default is the language your phone is set to, if supported, or US English otherwise.
You can choose which items to include in the email:
In it's most basic form, Seguro can be a drop-in replacement for a standard USB logger. Start with the start button, finish in the app. If you're receiving from suppliers, this is the workflow to use, because you want to minimize the complexity (and chance of mistakes) on their end.
To start the recording, hold down the red "START" button on the tag for 2 seconds, until the LED flashes 3 times, then release it. The tag will mark the start of the recording, and record samples periodically (every 10 minutes by default).
Set the tag aside, put it in the fridge, or your pocket. Have some lunch.
Tap the tag with your phone, or someone else's. Remember to unlock the phone first. The screen will show RECORDING at the top, and a chart showing the tag's temperature history so far.
Tap the "Stop" button at the bottom of the screen to show the recording control view.
You can set the temperature range for the recording, and add annotations like photos and barcode scans.
Tap the Stop button again in the recording control view, and the full recording will be displayed.
In the bottom-right corner of the screen, you'll see the export button. Tap this, and you can choose which files you want to download to your phone.
If you've set up your account for email notifications, you'll see an email arrive within a minute or so with the attachments you selected in the notification settings.
The second way to create a recording is by using Seguro's unique "snapshot" feature. Seguro tags are always on, so you can use them to create a recording, even if someone forgot to press the start button. It's also a great way to try out some of the great features of Seguro, since you don't need to wait for it to accumulate samples.
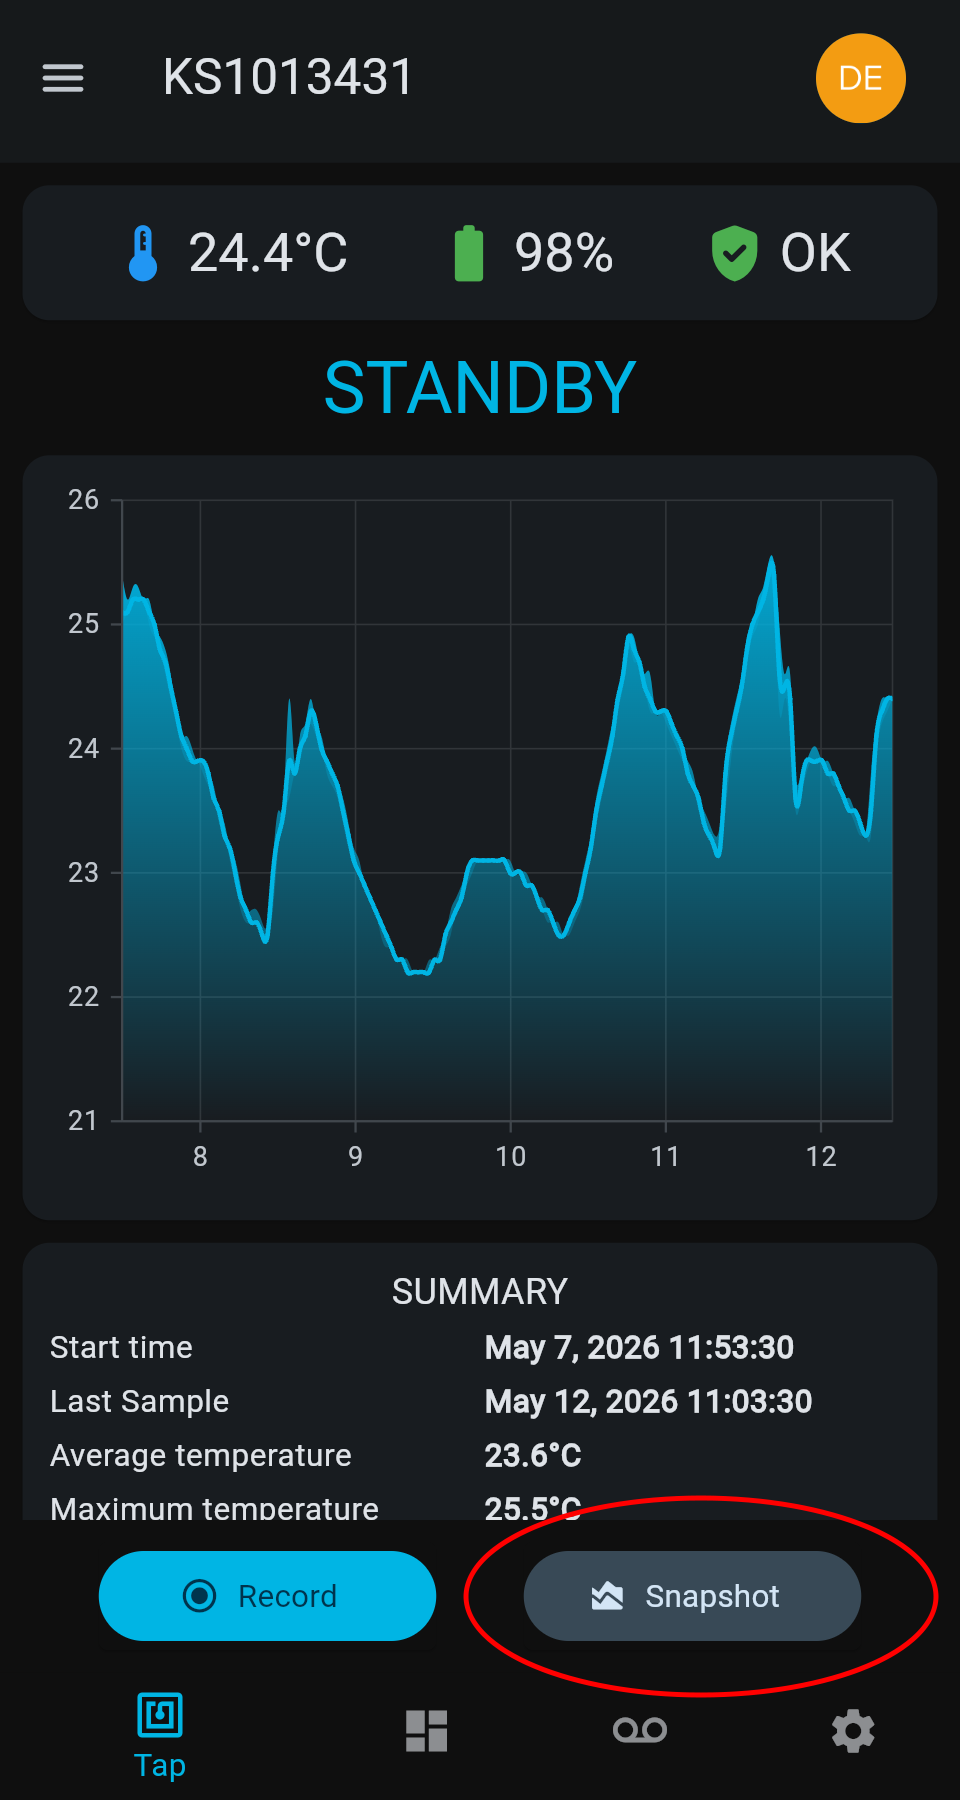
To create a snapshot recording, tap the tag with your phone as usual, and make sure the tag is in STANDBY mode.
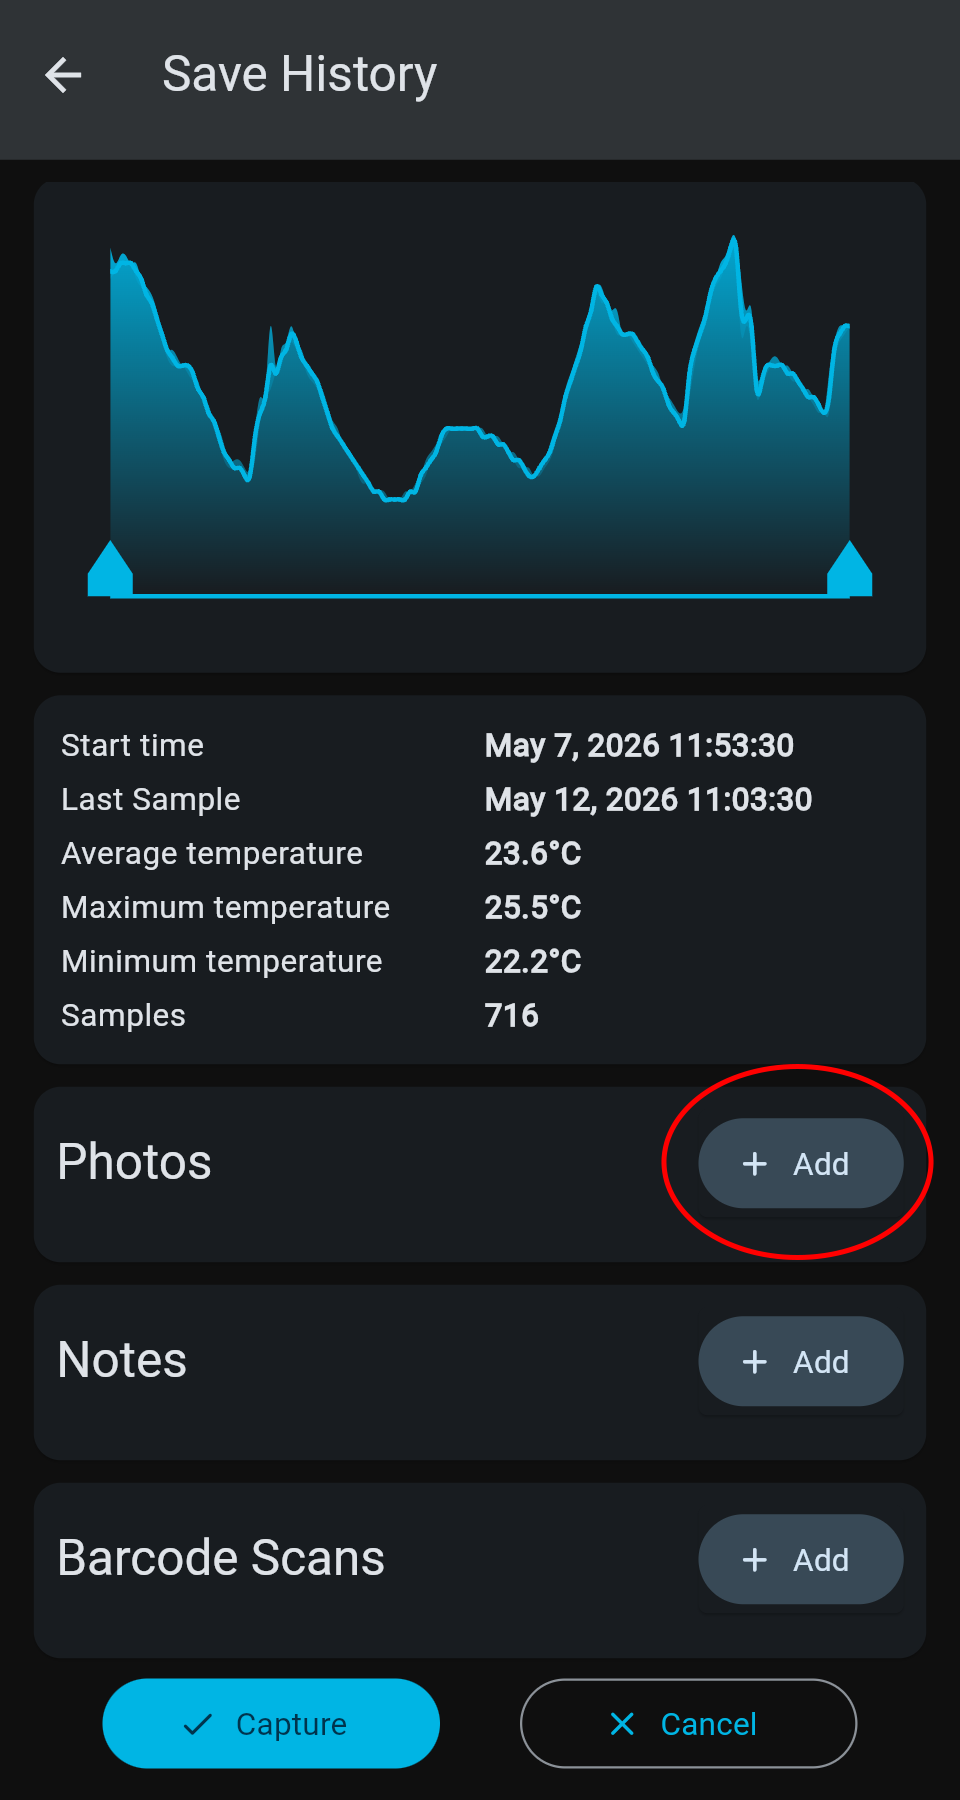
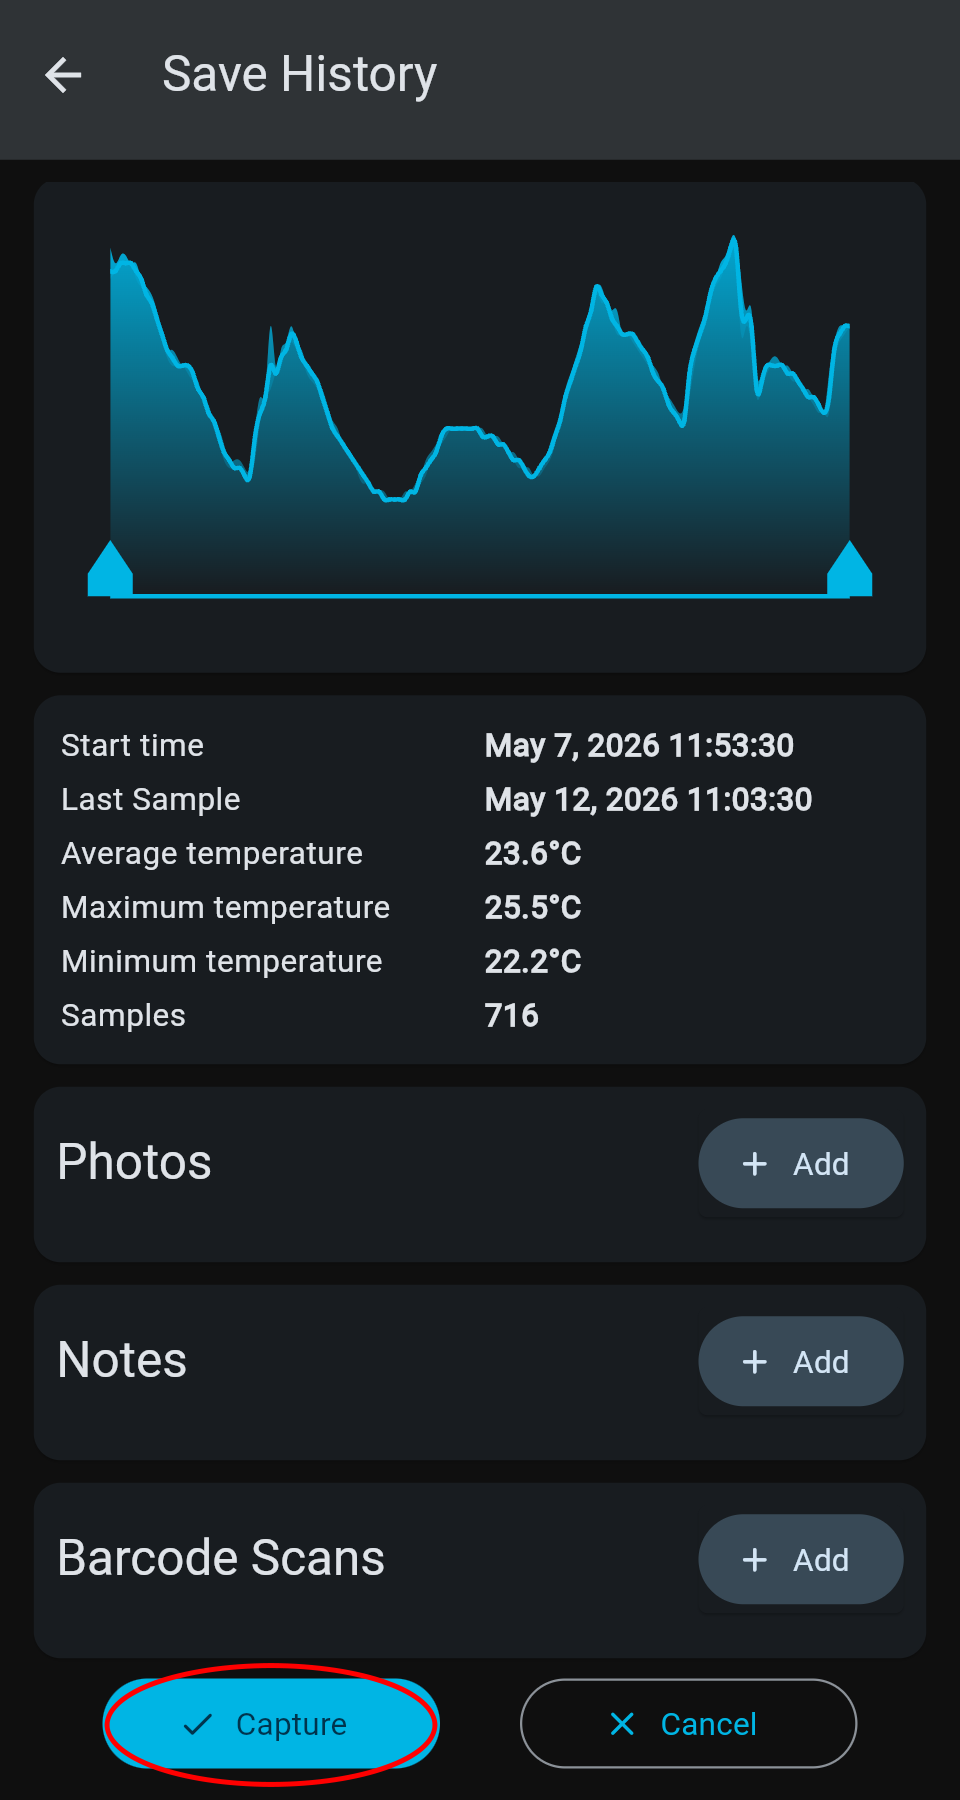
Tap the gray "Snapshot" button in the bottom-right corner. This opens the familiar recording control view, and allows you to add temperature range, a name, location, and annotations such as photos.
By default, the recording will contain the full recording buffer (28 days, assuming a 10 minute sampling rate). You can adjust the start and end of the recording by moving the pointers underneath the chart.
When you're finished, tap "Capture" at the bottom-left corner of the screen.
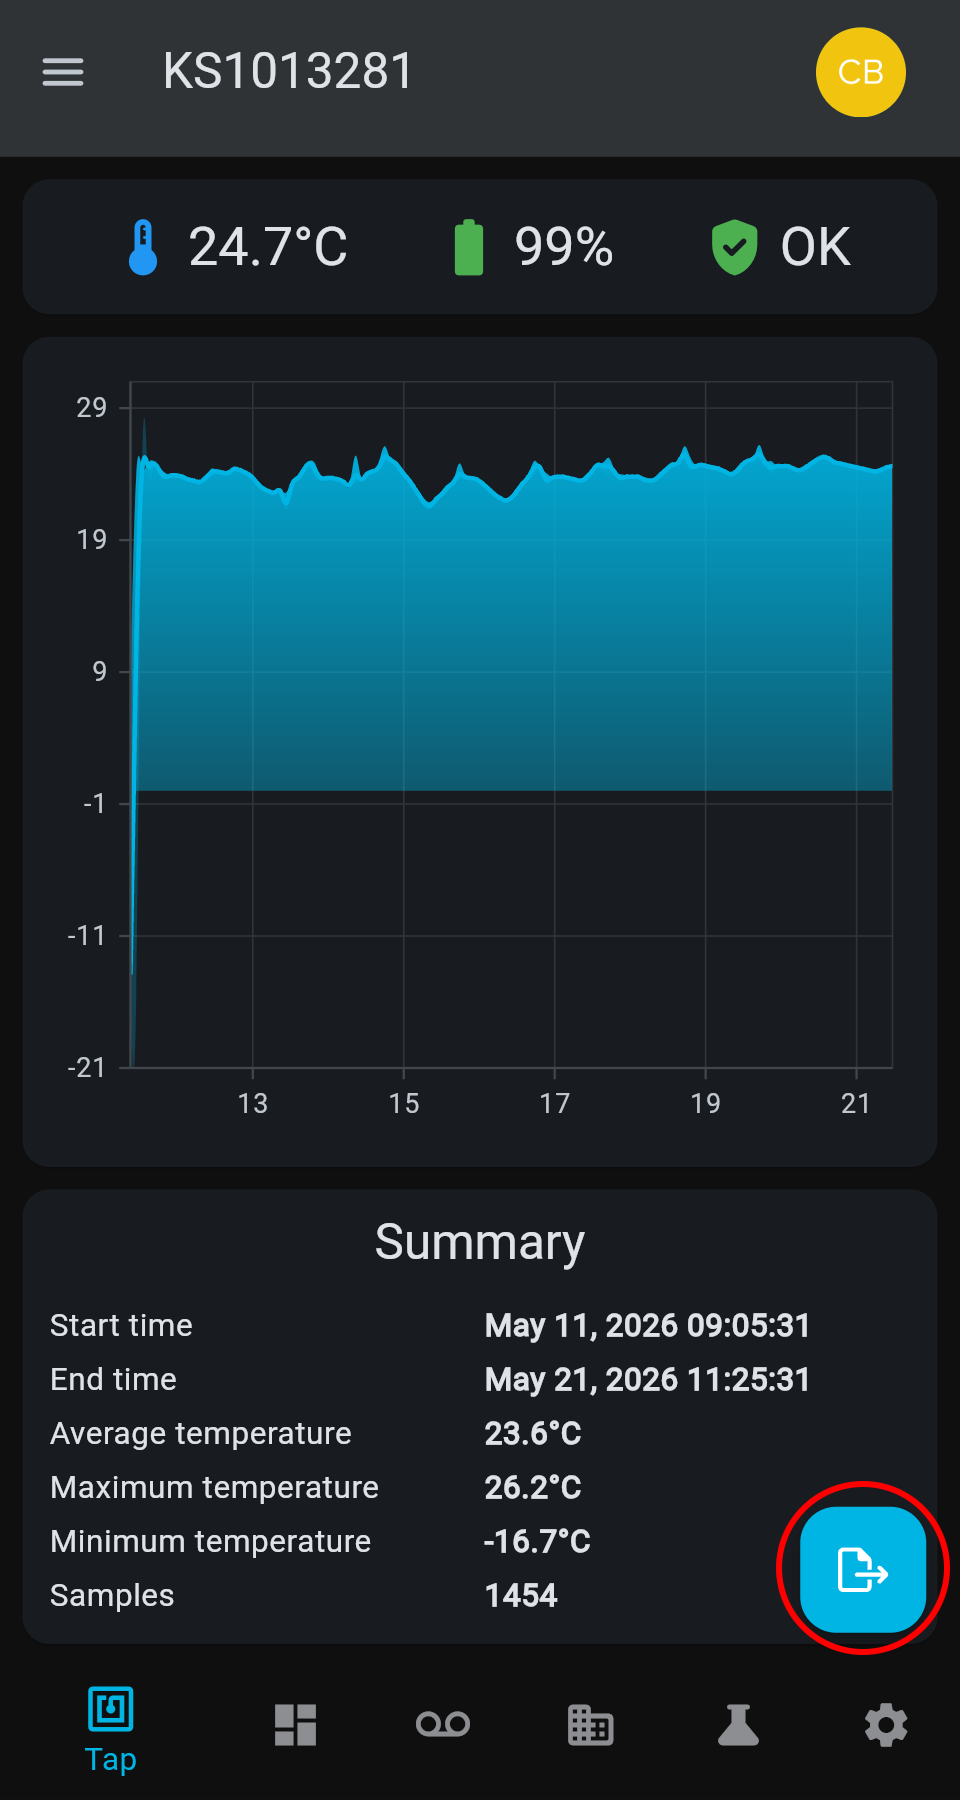
The screen will change to the recording view, with the export button displayed in the bottom-right corner.
Like a "regular" recording, you'll receive an email if you've set up email notifications.
The final workflow is one that is unique to Seguro, and makes it particularly well-suited to the final mile.
In a normal USB logger shipment, the sender only needs to press the start button on the logger, and it's the responsibility of the receiver to stop the logger, connect it to a laptop, upload the data, and send it to stakeholders. This works fine when receiving supplies at a well-established pharma receiving facility, but isn't suitable for shipments to small sites or patients.
The final mile worklflow turns that around, so that the shipper starts the recording, adds the annotations, and sets the temperature range, and the receiver merely taps the tag with their phone and both the sender and receiver have access to the recording data.
To try the final mile workflow, it's best to have a colleague act as the receiving party.
Start bytapping the tag with your phone, as usual, and making sure it's in STANDBY.
Tap the "Record" button in the bottom-left corner, and set the temperature range. Add any annotations you would like to add to the recording.
Check the "Finish on next tap" checkbox. This tells the Seguro platform to automatically complete the recording the next time someone taps the tag with their phone.
Tap the "Start" button in the bottom-left corner of the recording control panel.
Set the tag aside, put it in the fridge, or your pocket. Take your colleague to lunch.
Ask your colleague to unlock their phone, and tap the Seguro tag. The Seguro web app will open on their phone, and display the recording record. They'll be able to download files to their phone using the export button in the bottom-right corner, as usual.
At the same time, you'll receive a notification email (assuming you've set up email notifications) containing all of the attachments you've selected in your settings.
One of the most powerful features of the Seguro platform is that the tight integration between the hardware, app, and cloud allows the user to annotate recordings with additional information. Photos, notes, and barcode scans can all be added at the beginning, end, or even in the middle of a recording. Snapshot recordings can also be annotated in the same way.
Photos are useful for photographic evidence of the shipment condition, particularly at the end of the recording. If there was a temperature excursion and it appears to be due to a damaged shipping container, attaching a photo of the damage is a useful tool in resolving disputes.
Any number of photos can be attached to a recording, and they can be attached at the beginning, end or even added to the middle of the recording. For simplicity, we're going to use the snapshot recording capability in this exercise.
Tap the tag with your phone. Remember to unlock the phone first. Make sure the screen shows STANDBY at the top.
Tap the grey "Snapshot" button at the bottom-right corner of the screen.
In the Photos section, tap the grey "Add" button. If this is the first time attaching photos, you may need to grant camera and microphone permissions.
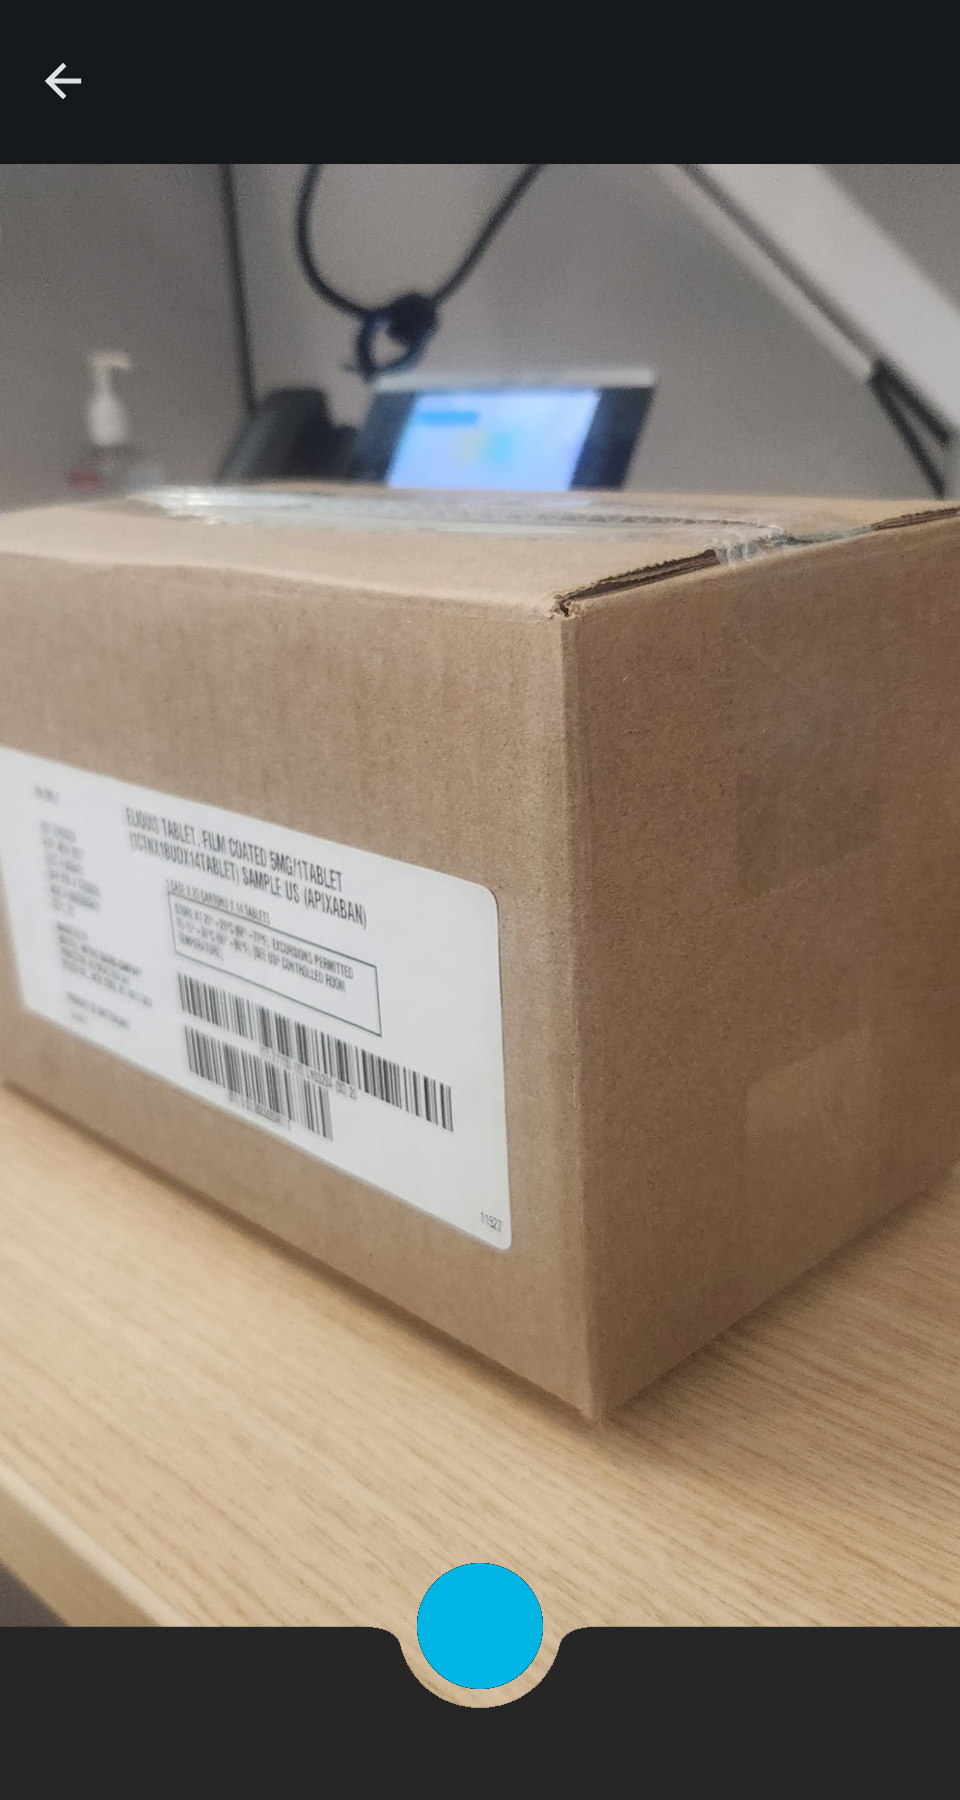
The camera view will be displayed. Tap the blue button to take a photo. You can keep the photo, retake, or just cancel the photo.
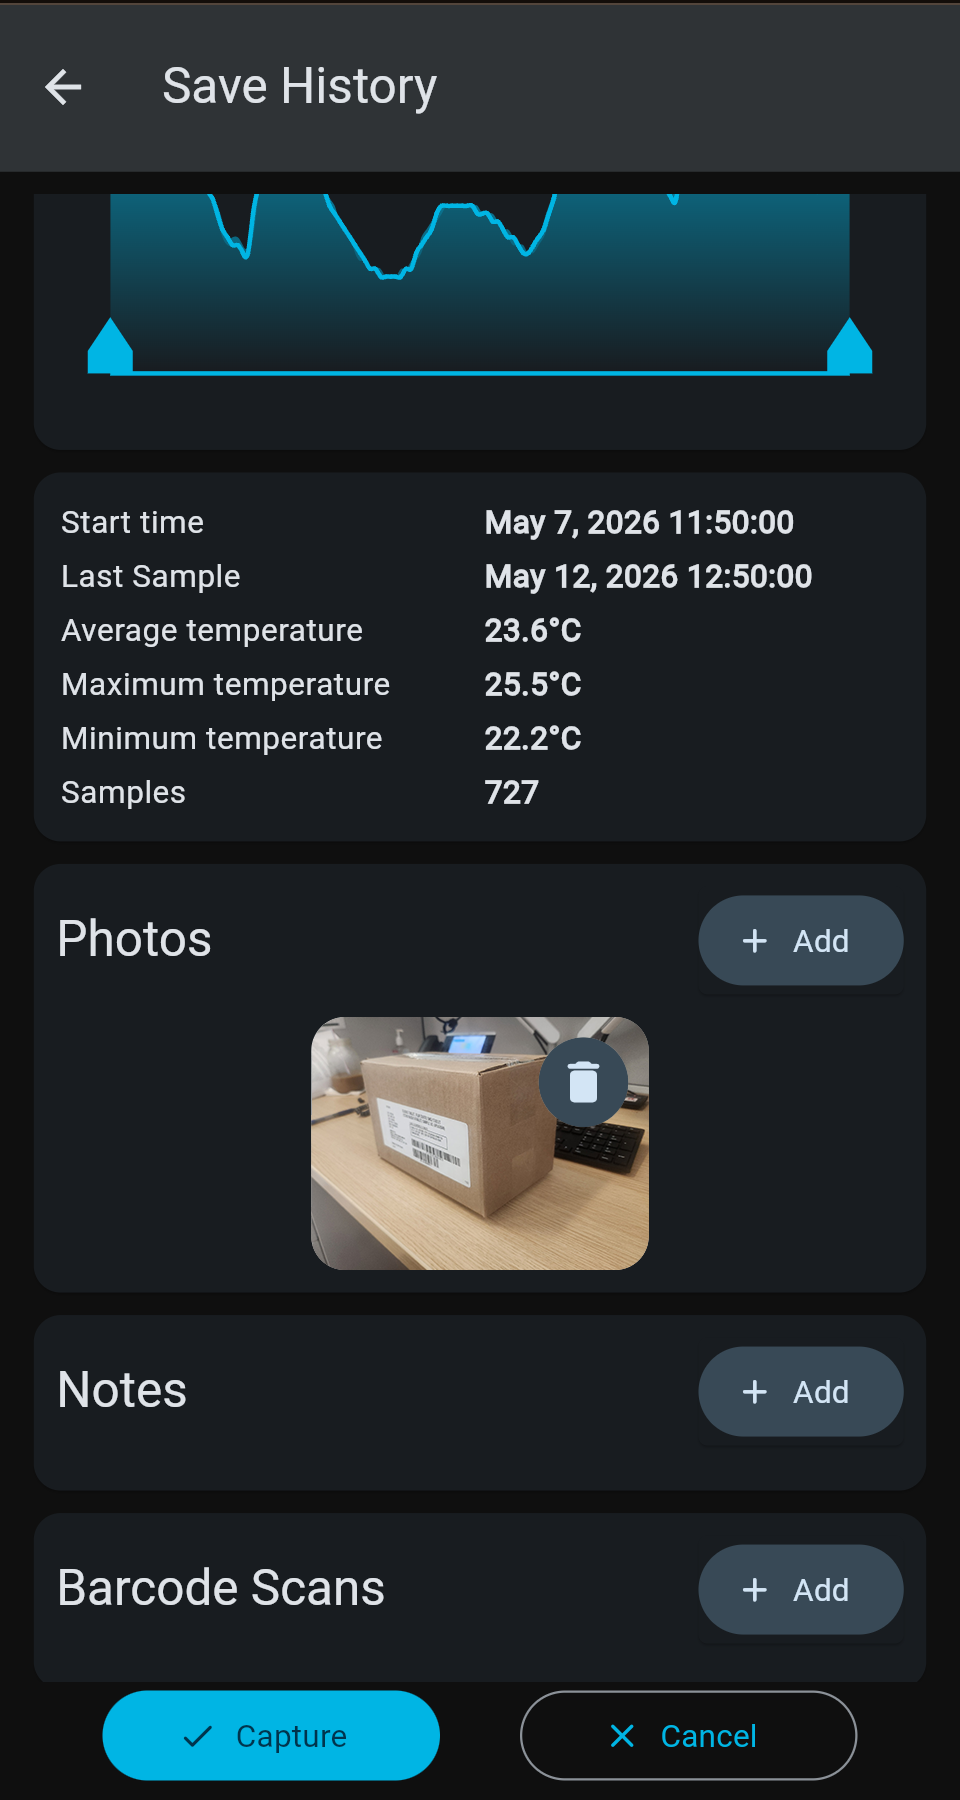
Once you tap "Keep", the photo will be added to the recording when it is saved, and a thumbnail of the photo will be added to the "Photos" section.
You can remove the photo from the Photos list by tapping the garbage can icon in the top-right corner of the thumbnail.
Save the snapshot recording by tapping the blue "Capture" button in the bottom-left corner of the screen.
You'll see the recording view, including the attached photos. If you tap the blue export button in the bottom-right corner of the screen, you'll see options for PDF, Excel, or JSON files. Tap the PDF icon to download a PDF recording record.
When you open the PDF file using your preferred viewer, you'll see the photos displayed with their timestamps in the Photos section.
Notes can be used to add context to the recording, often in conjunction with photos. They can be used to provide explanations for excursions (e.g. Excursion at start was due to tag not being preconditioned) or additional detail on shipping.
Any number of notes can be attached to a recording, and, like photos, they can be attached at the beginning, end or even added to the middle of the recording. For simplicity, we're going to use the snapshot recording capability in this exercise.
Tap the tag with your phone. Remember to unlock the phone first. Make sure the screen shows STANDBY at the top.
Tap the grey "Snapshot" button at the bottom-right corner of the screen.
In the Notes section, tap the grey "Add" button.
The note view will be displayed. Add a title (e.g. "Damaged Container") and text (e.g. Shipping container was crushed on top corner and panel integrity compromised.")
Once you tap "Save", the note will be added to the recording when it is saved, and a thumbnail of the note will be added to the "Notes" section.
You can remove the note from the Notes list by tapping the garbage can icon in the top-right corner of the thumbnail.
Save the snapshot recording by tapping the blue "Capture" button in the bottom-left corner of the screen.
You'll see the recording view, including the attached notes. If you tap the blue export button in the bottom-right corner of the screen, you'll see options for PDF, Excel, or JSON files. Tap the PDF icon to download a PDF recording record.
When you open the PDF file using your preferred viewer, you'll see the notes displayed with their timestamps in the Notes section.
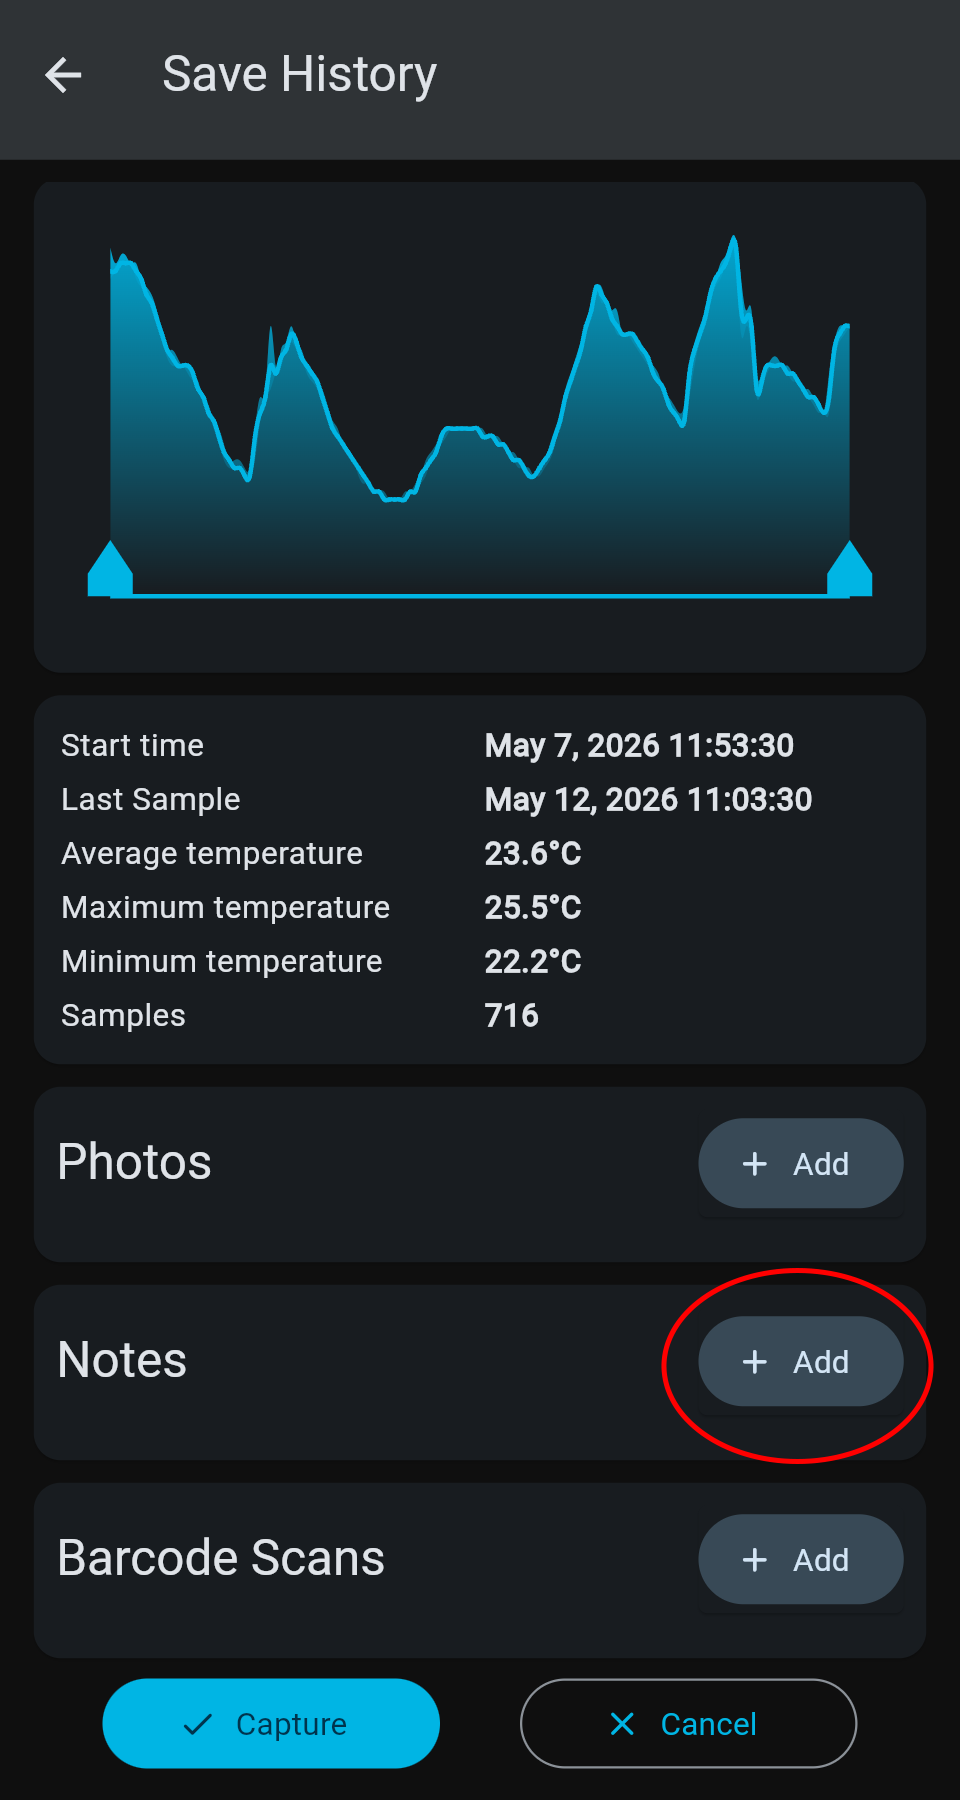
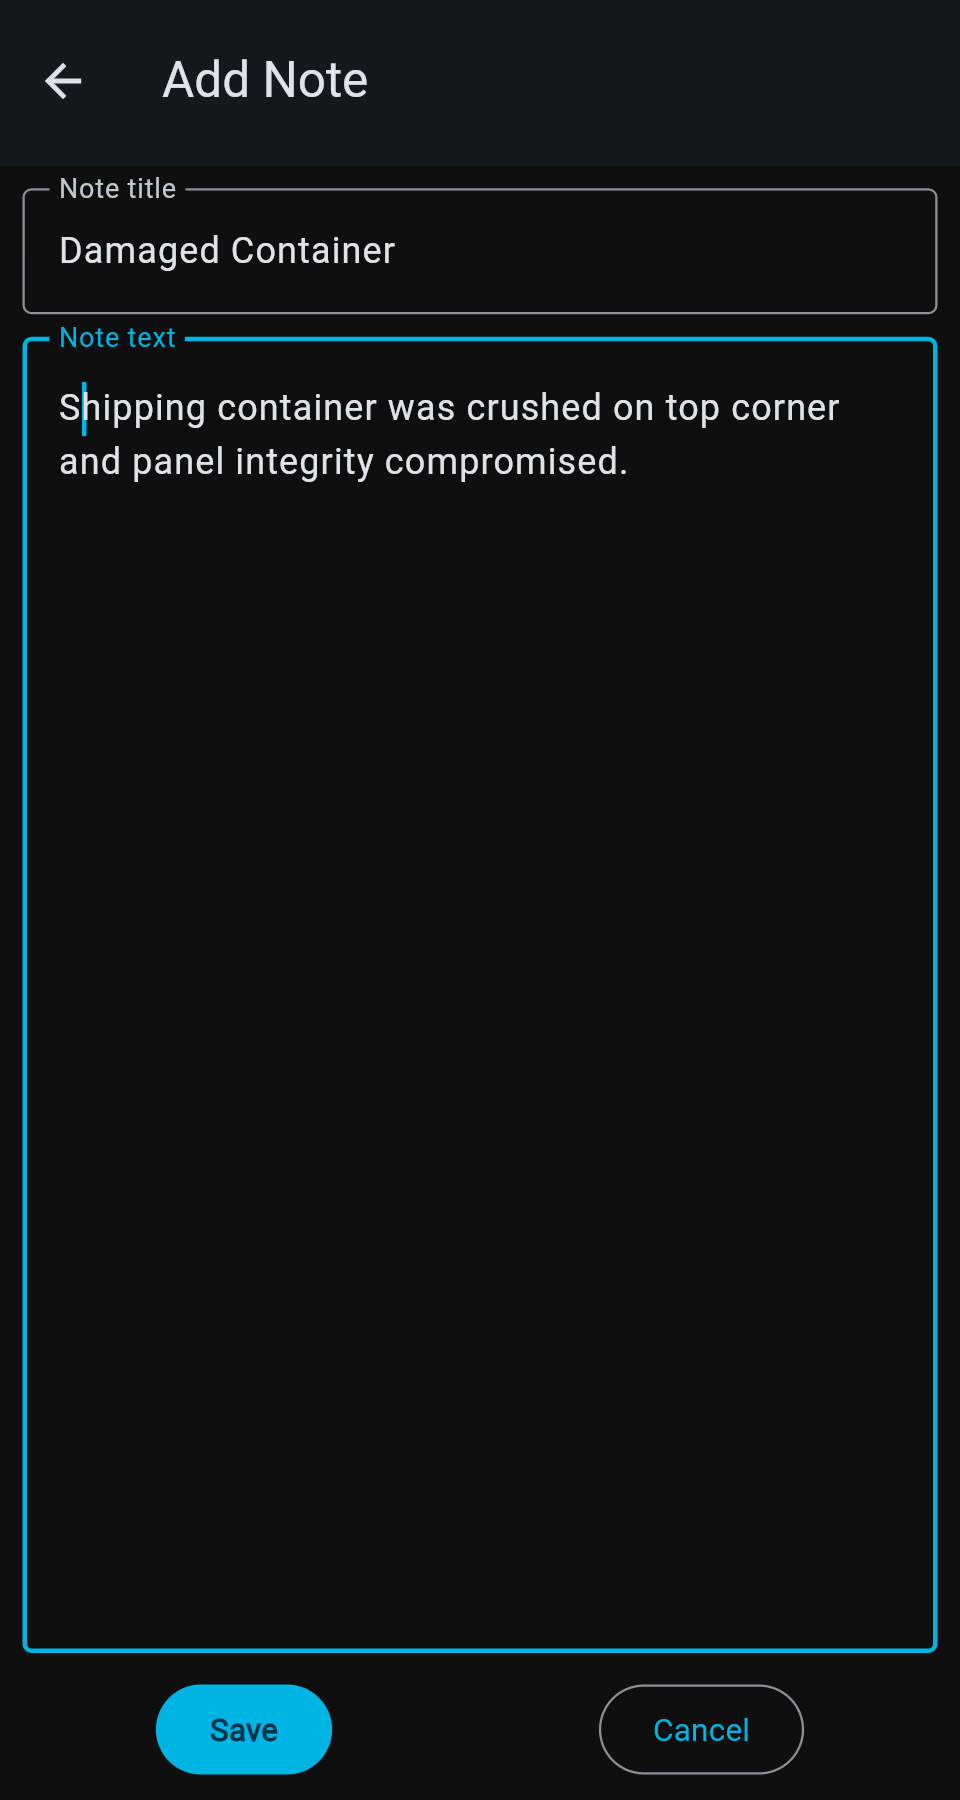
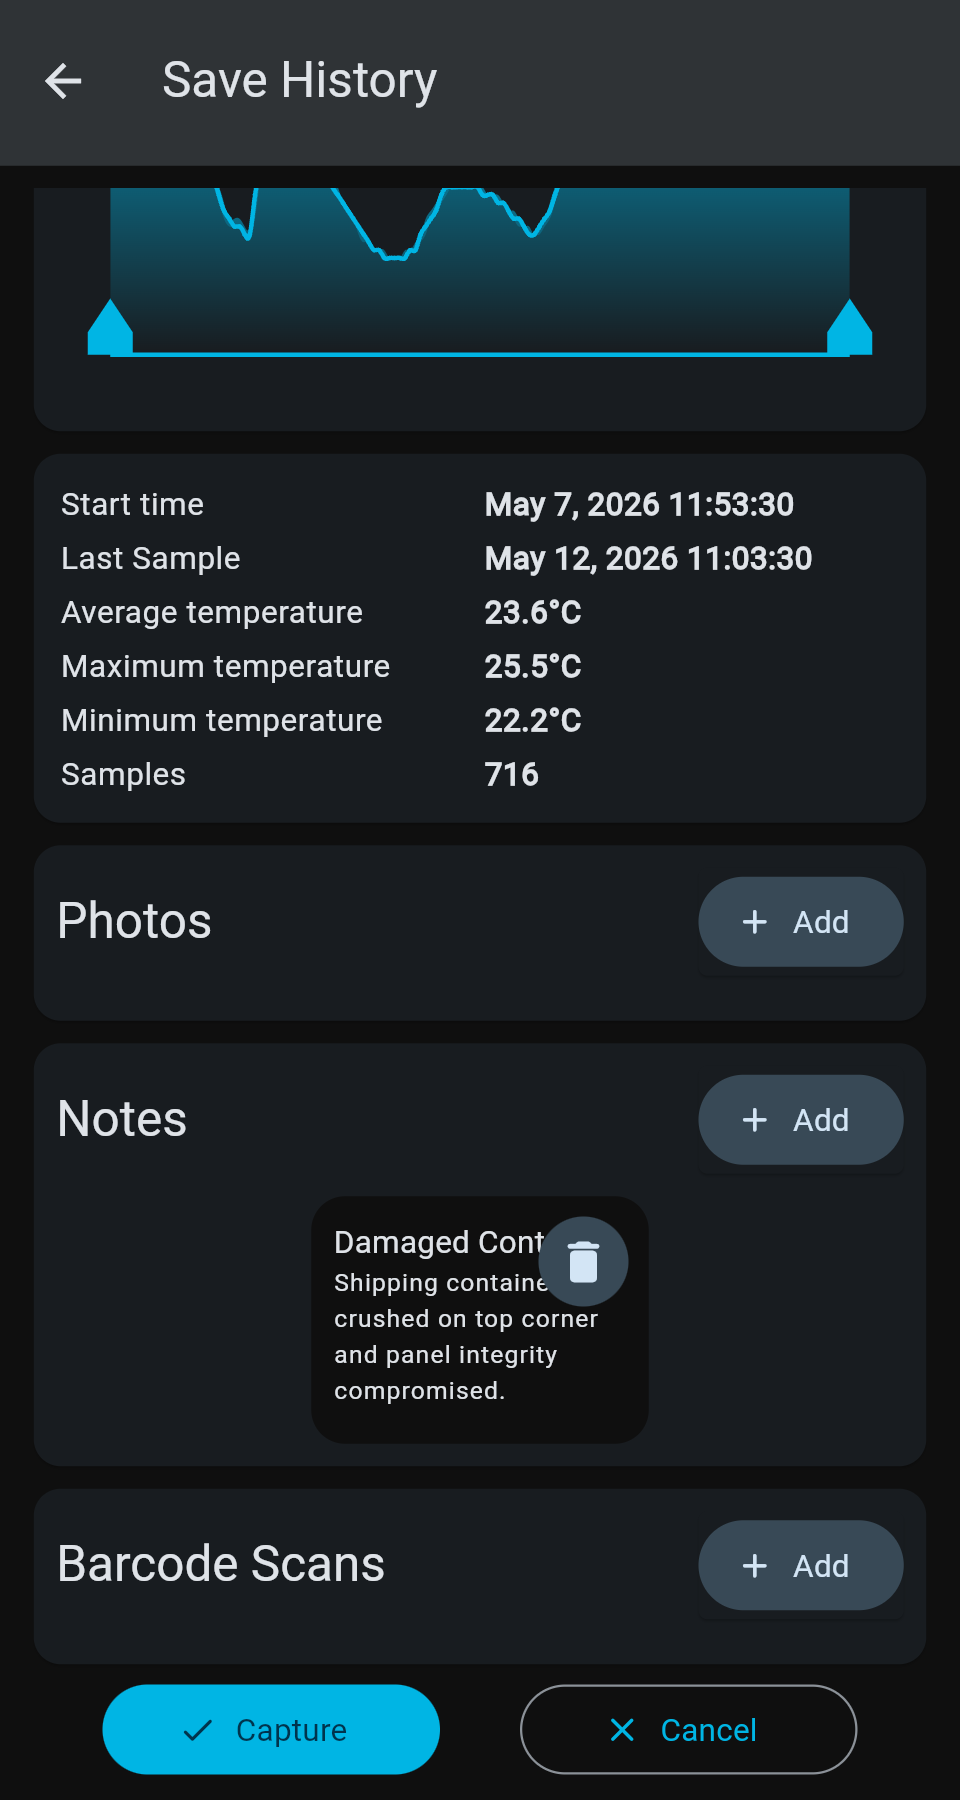
Barcodes have become indispensible in logistics as a way to reduce manual transcribing and improve shipment accuracy. The Seguro platform allows users to scan barcodes and attach the data to a recording. Like photos and notes, they can be added at the beginning, end or in the middle of a recording.
The Seguro platform understands many different types of barcodes, and will parse them as needed. In addition, the platform supports the following barcode-related enhancements:
Any number of barcode scans can be attached to a recording, and, like photos and notes, they can be attached at the beginning, end or even added to the middle of the recording. For simplicity, we're going to use the snapshot recording capability in this exercise.
Tap the tag with your phone. Remember to unlock the phone first. Make sure the screen shows STANDBY at the top.
Tap the grey "Snapshot" button at the bottom-right corner of the screen.
In the Barcode Scans section, tap the grey "Add" button.
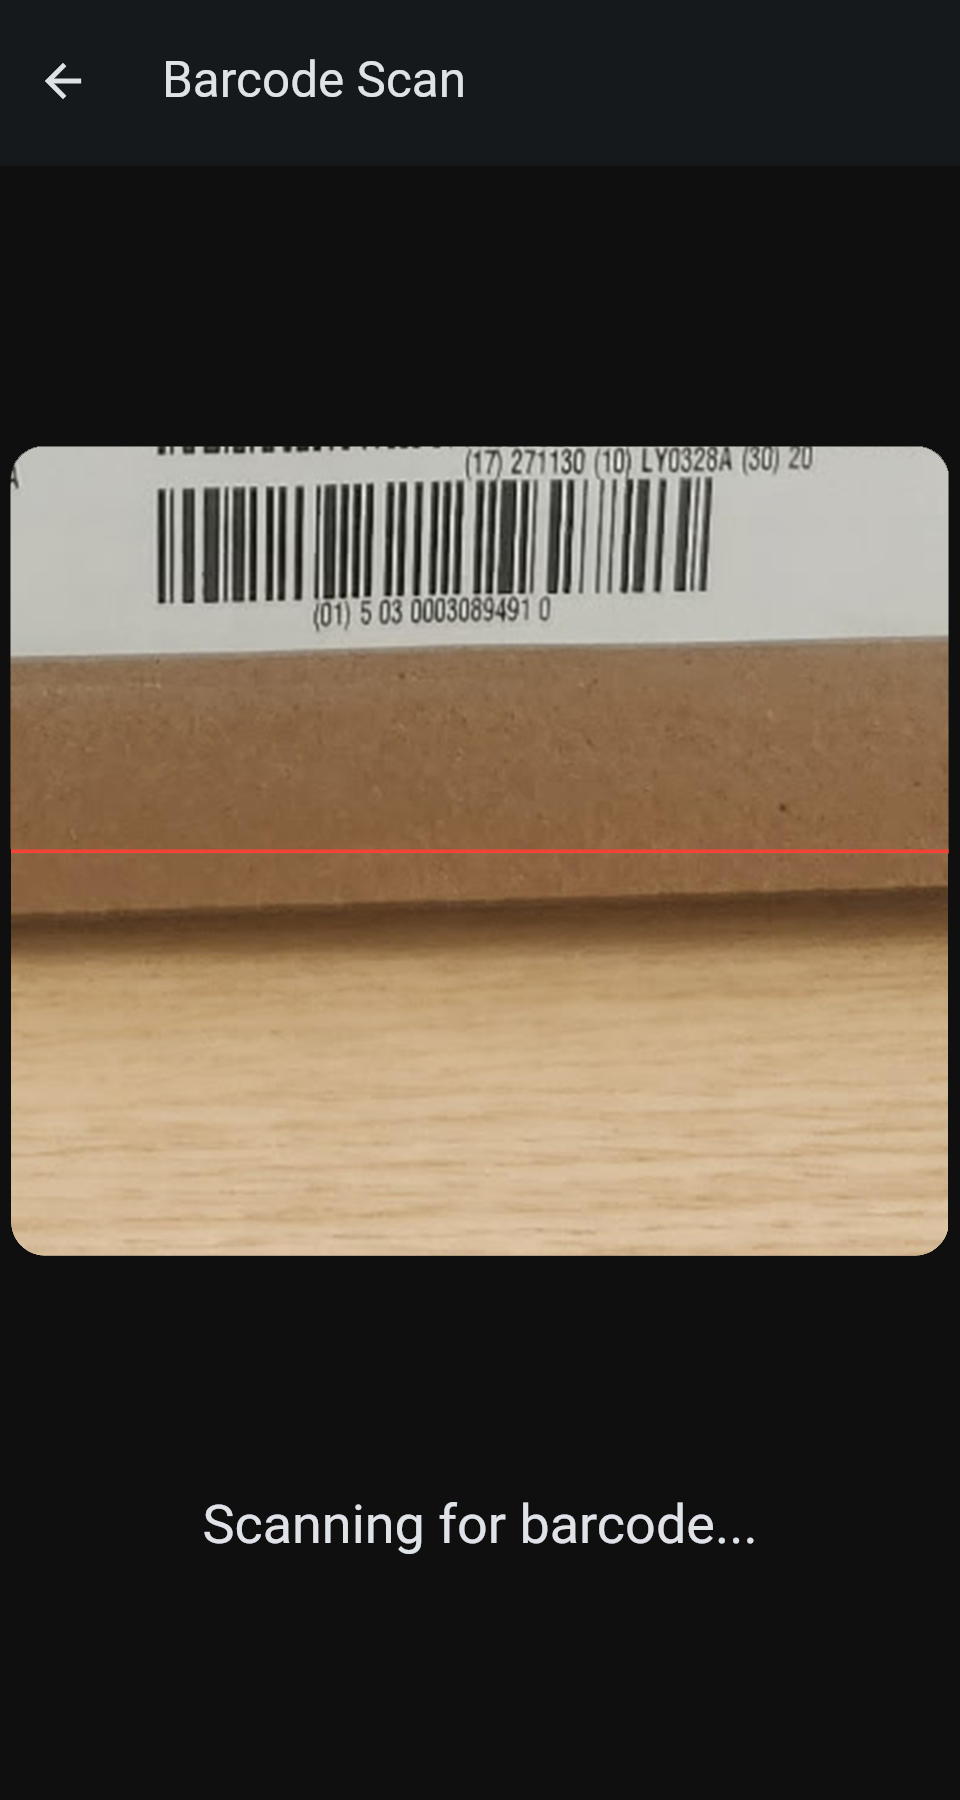
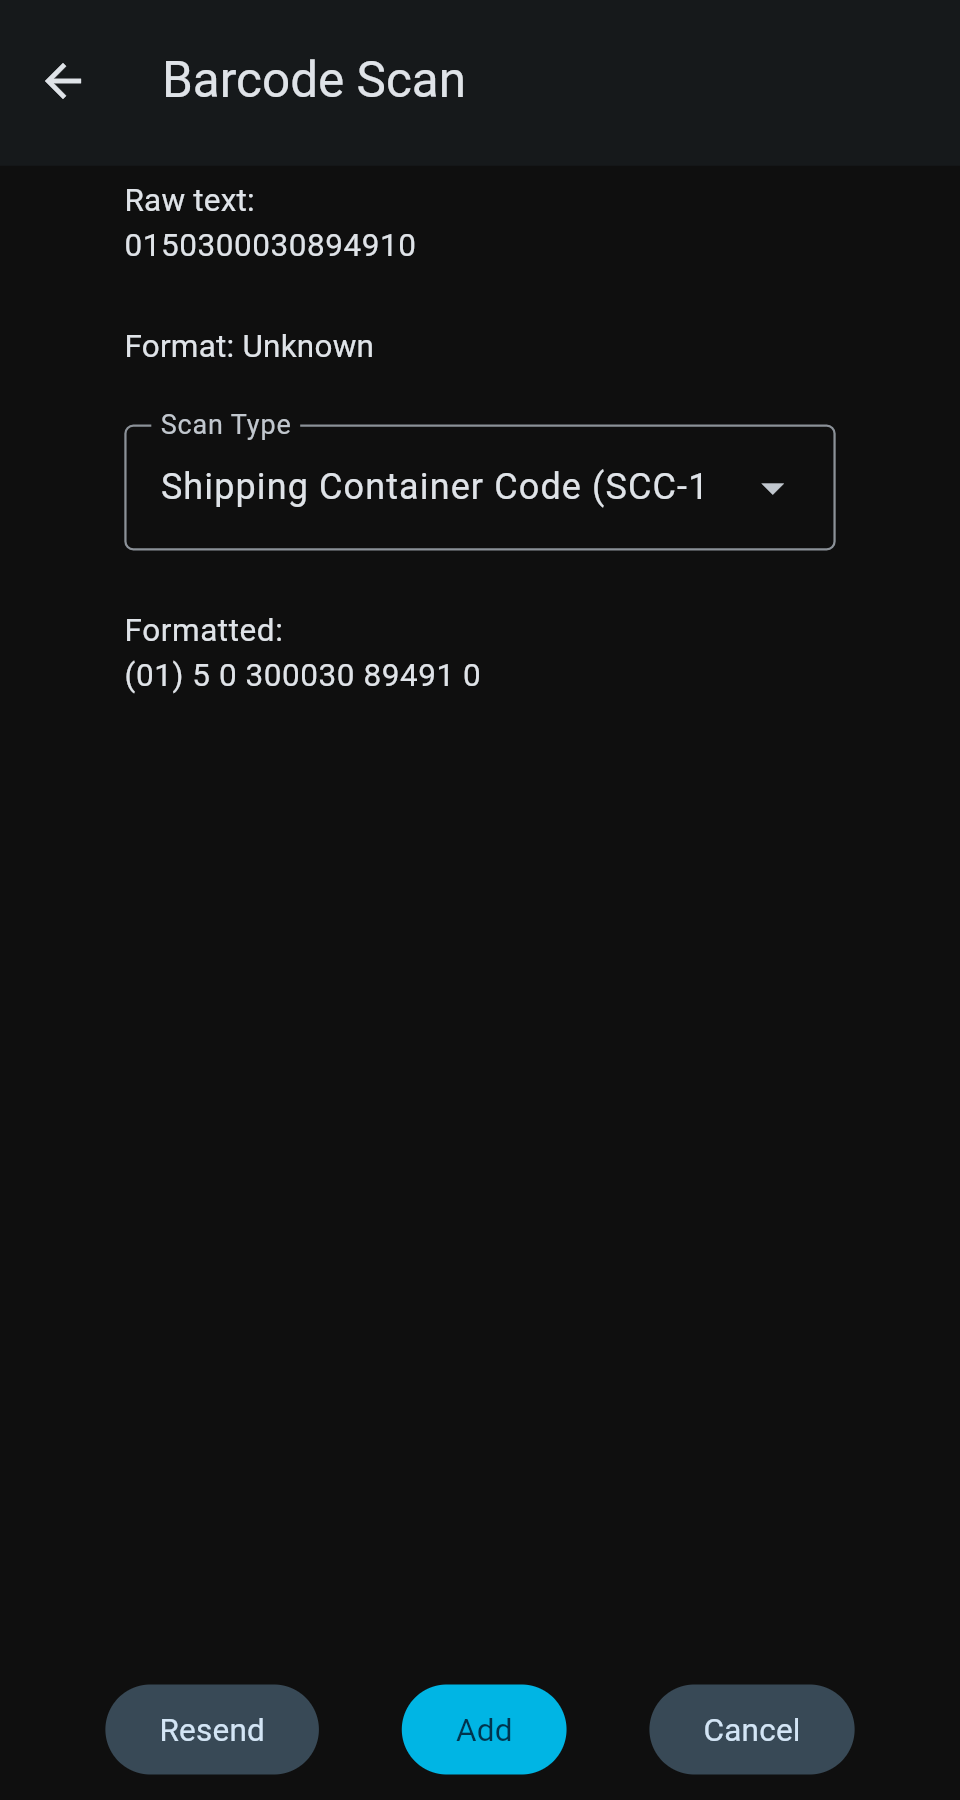
The scanner view will be displayed. The scanner will pick up virtually any barcode, so if you have several barcodes on a label you may need to point the camera carefully. When the scanner sees a barcode, it will close the scanning window and display the raw code, the barcode type, and the parsed barcode data, if it was recognized.
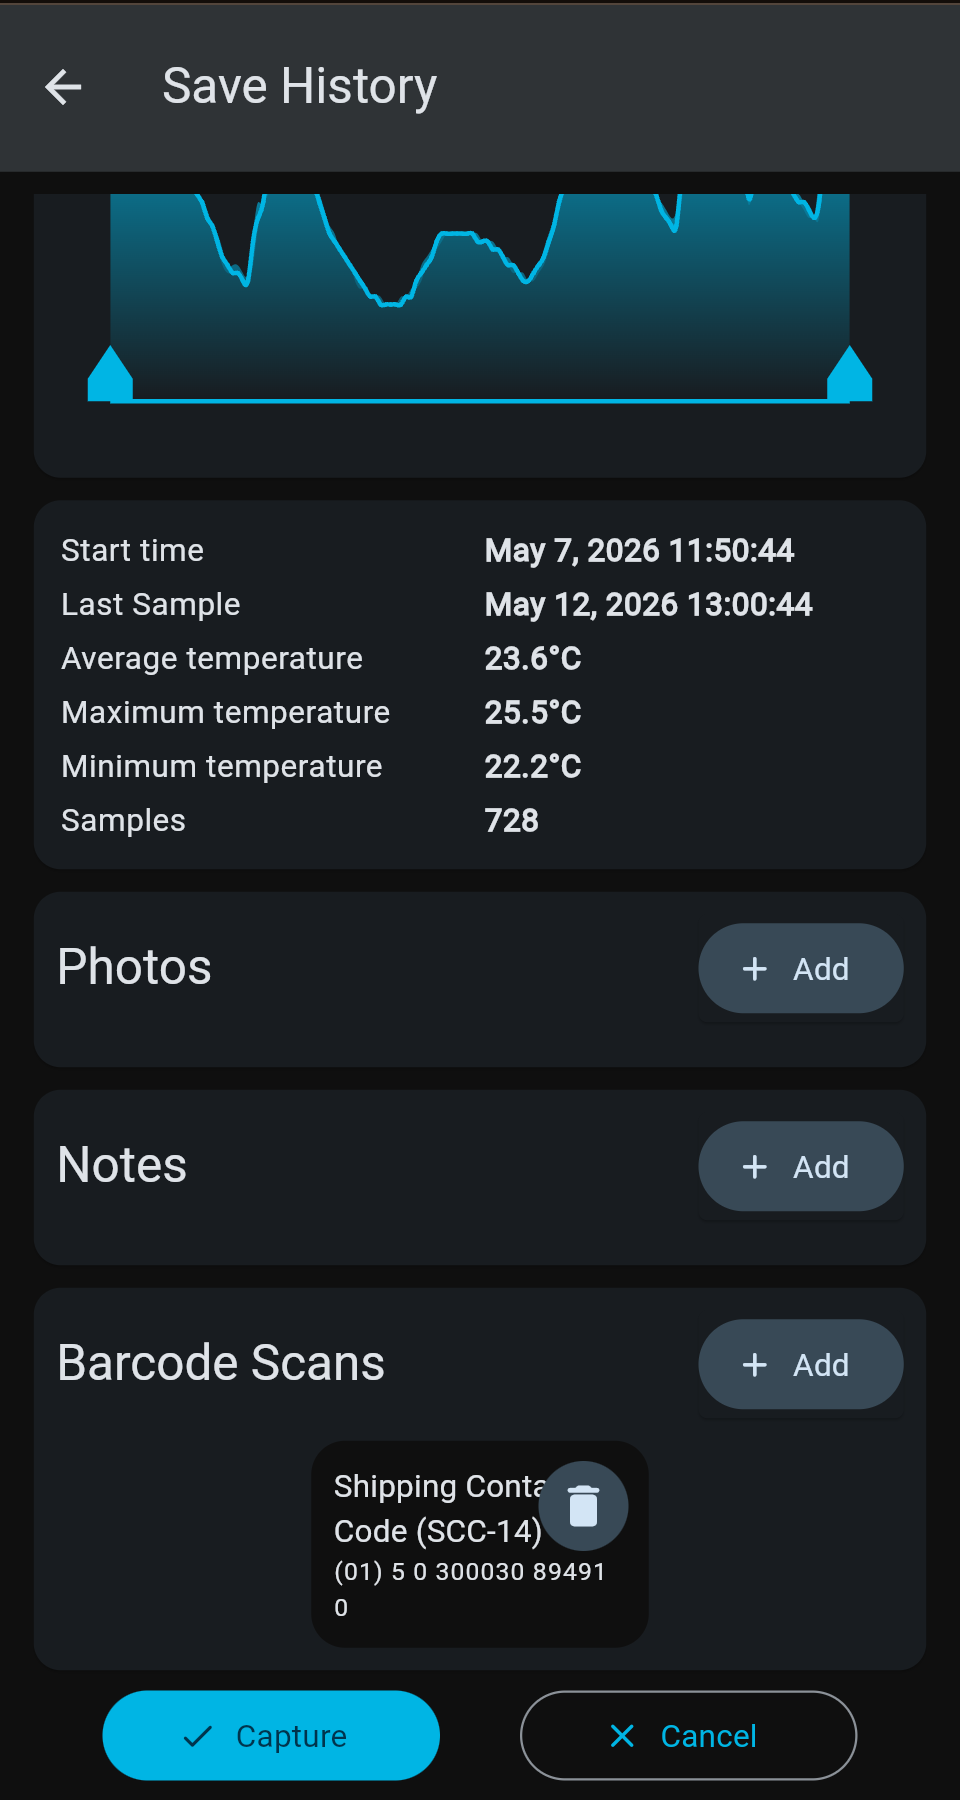
Once you tap "Save", the barcode information will be added to the recording when it is saved, and a thumbnail of the barcode data will be added to the "Barcode Scans" section.
You can remove the barcode data from the Barcode Scans list by tapping the garbage can icon in the top-right corner of the thumbnail.
Save the snapshot recording by tapping the blue "Capture" button in the bottom-left corner of the screen.
You'll see the recording view, including the attached barcode scans. If you tap the blue export button in the bottom-right corner of the screen, you'll see options for PDF, Excel, or JSON files. Tap the PDF icon to download a PDF recording record.
When you open the PDF file using your preferred viewer, you'll see the barcode scans displayed with their timestamps in the Barcode Scans section.
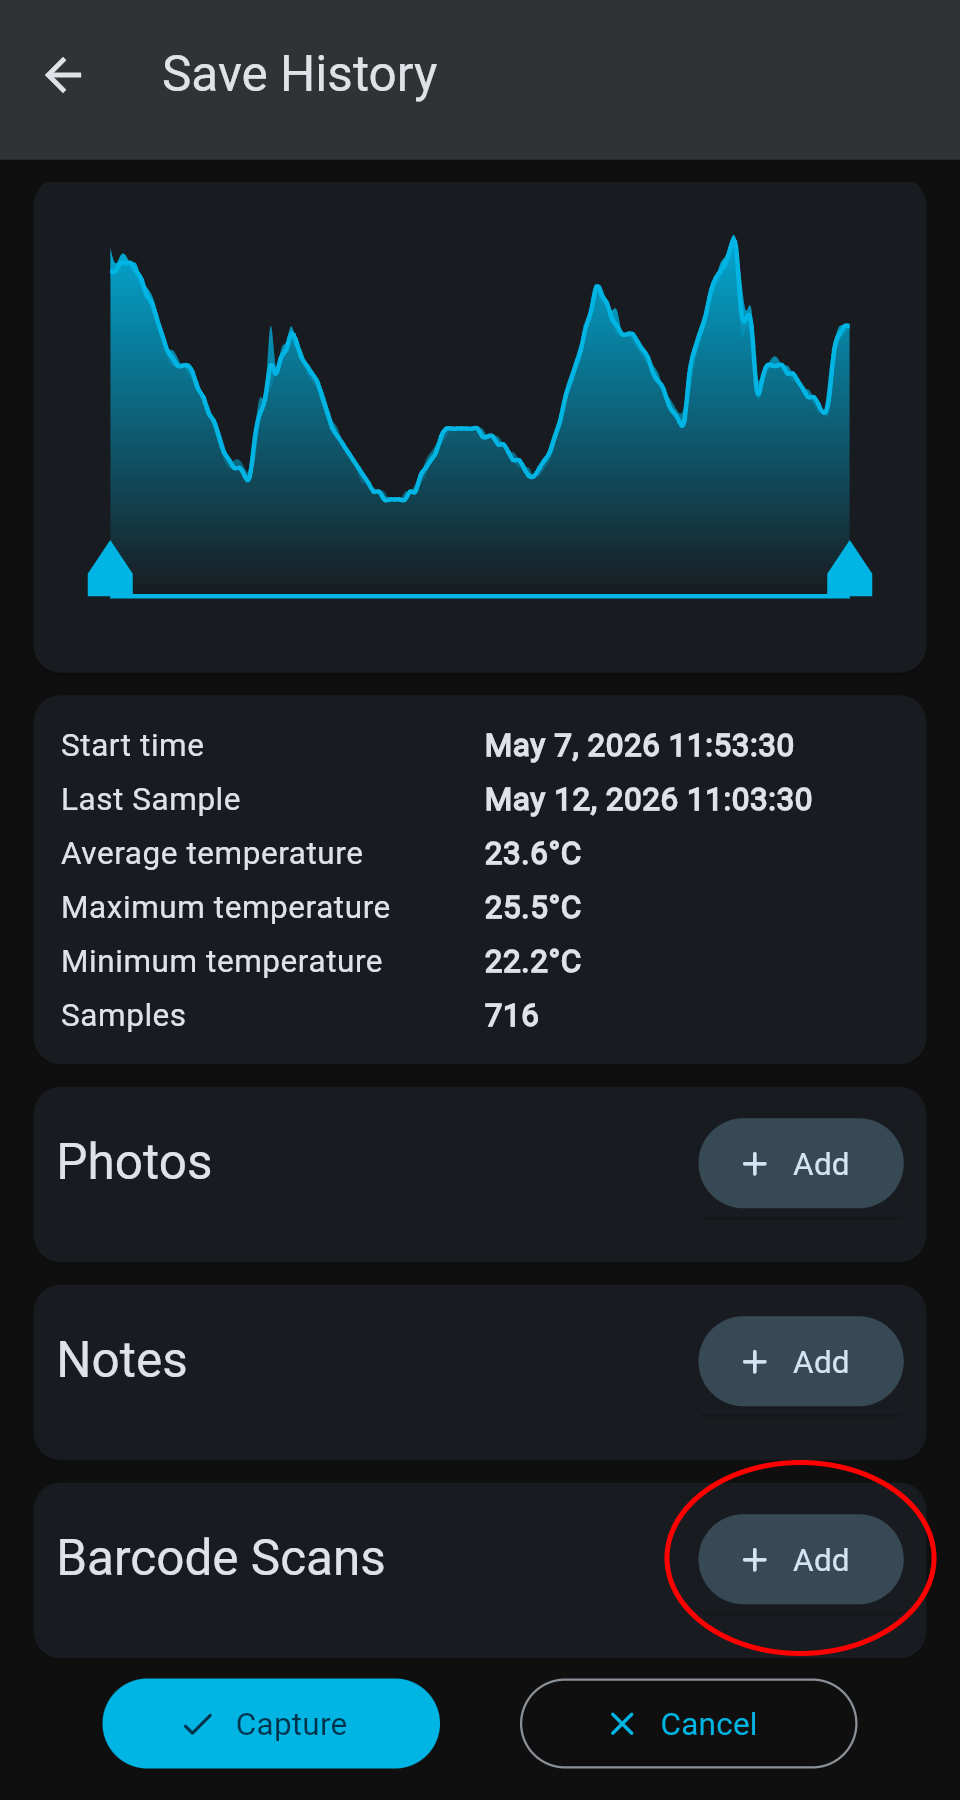
Although Seguro tags do not have GPS capability themselves, You can add location to the start and end of a recording using your phone's location capabilities.
Location data can be added to either the start or the end of the recording. Snapshots, and "final mile" recordings are handled as follows:
For simplicity, we're going to use the snapshot recording capability in this exercise.
Tap the tag with your phone. Remember to unlock the phone first. Make sure the screen shows STANDBY at the top.
Tap the grey "Snapshot" button at the bottom-right corner of the screen.
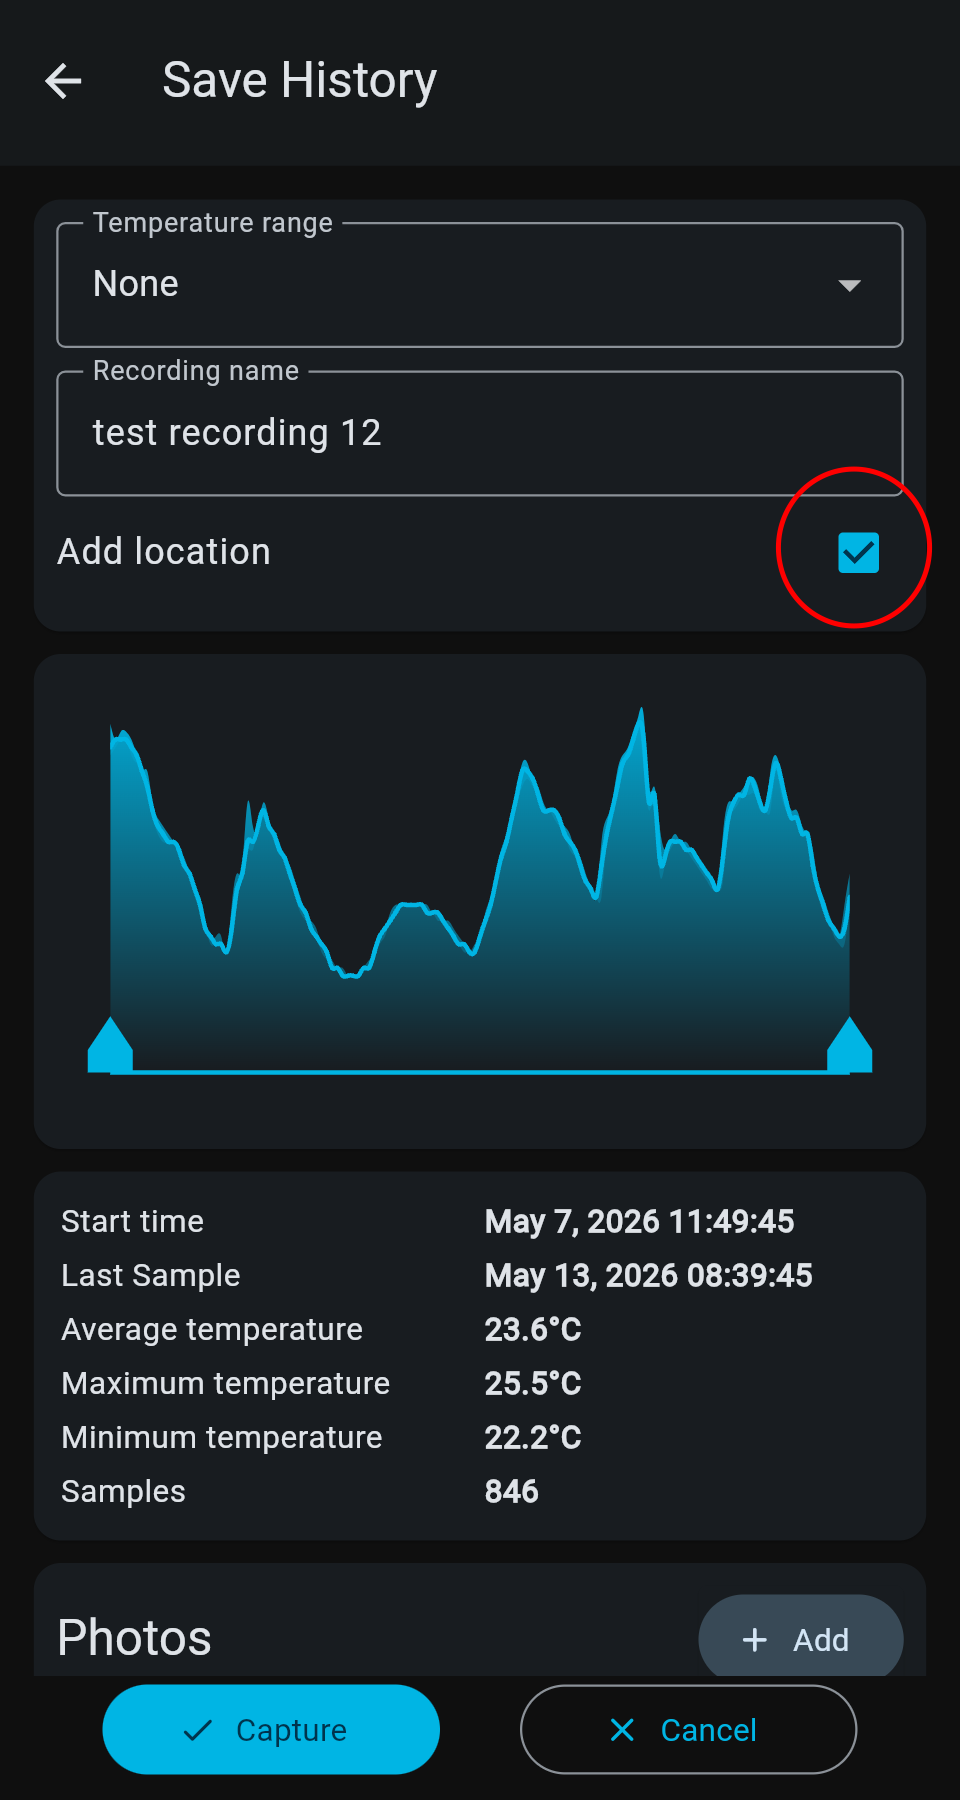
Make sure the "Add location" checkbox is checked.
Save the snapshot recording by tapping the blue "Capture" button in the bottom-left corner of the screen.
You'll see the recording view, including the attached barcode scans. If you tap the blue export button in the bottom-right corner of the screen, you'll see options for PDF, Excel, or JSON files. Tap the PDF icon to download a PDF recording record.
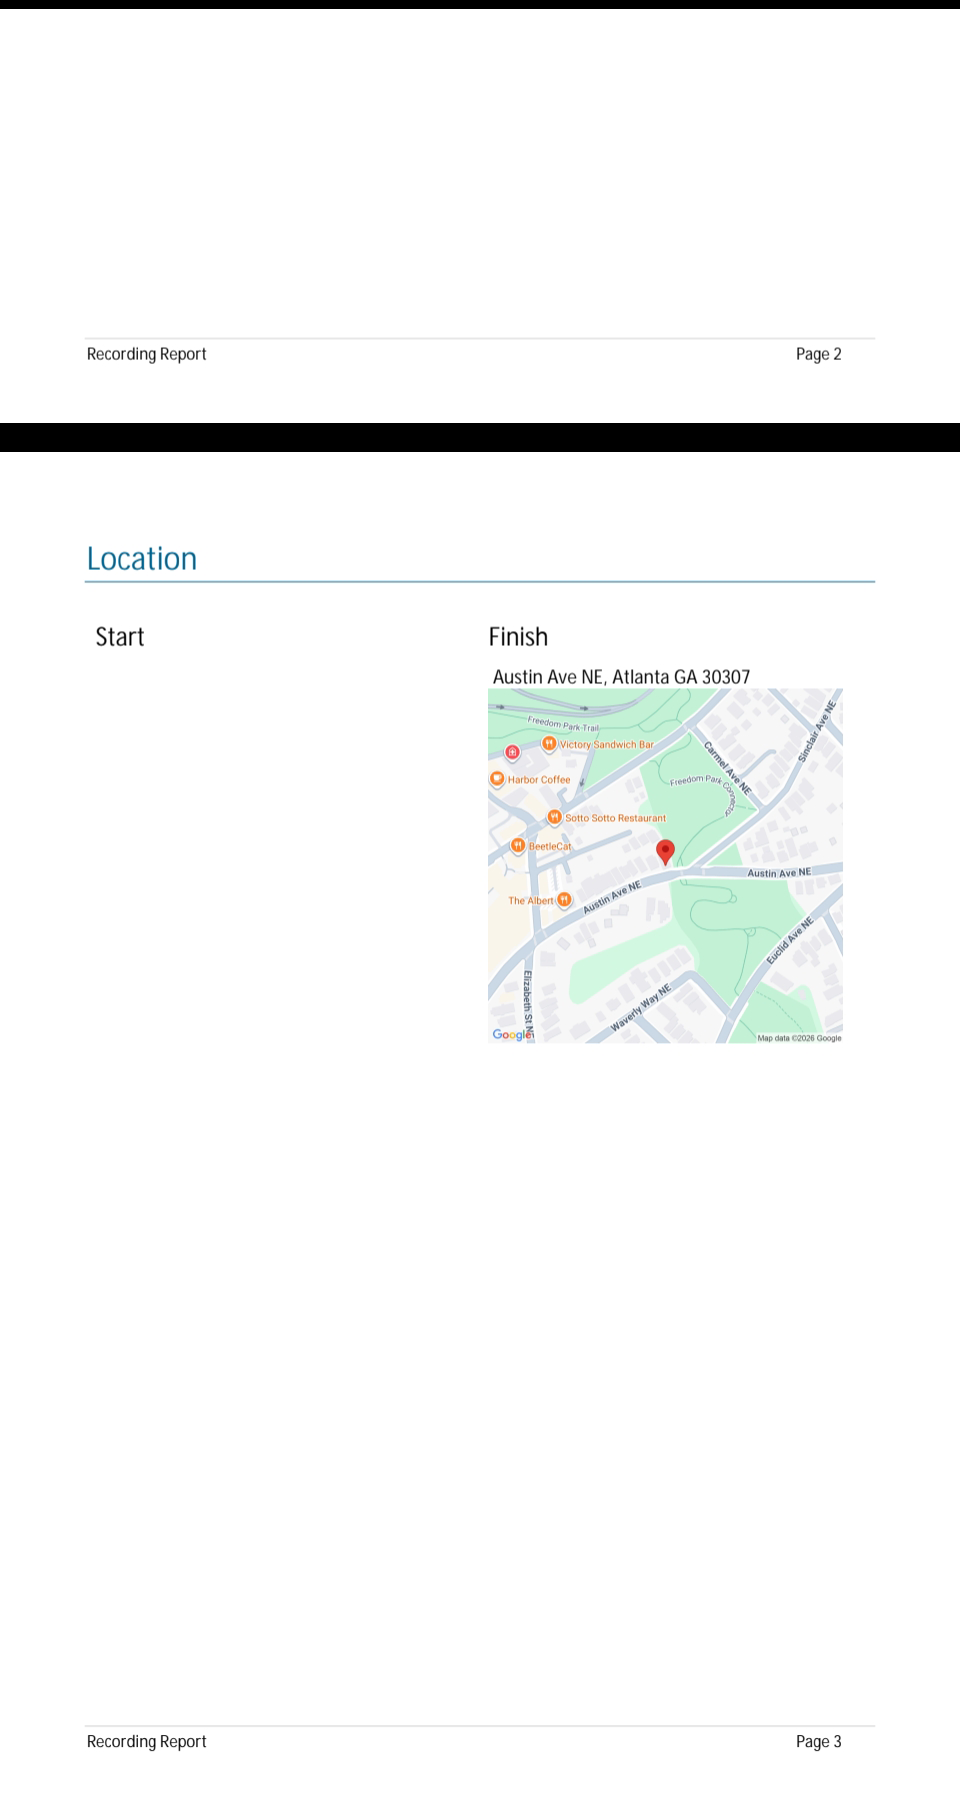
When you open the PDF file using your preferred viewer, you'll see the Finish location displayed after the recording summary section. The Start location should be blank.
One of the most powerful features of the Seguro platform is the ability to manage groups of users in an organization. Organization admins can allow limited or full visibility of recordings, audit records, and other users, and set up notifications on a per-user basis.
Of course, there's no requrement to set up an organization to use the Seguro platform. All of the features available to users in an organization are available to individual users as well.
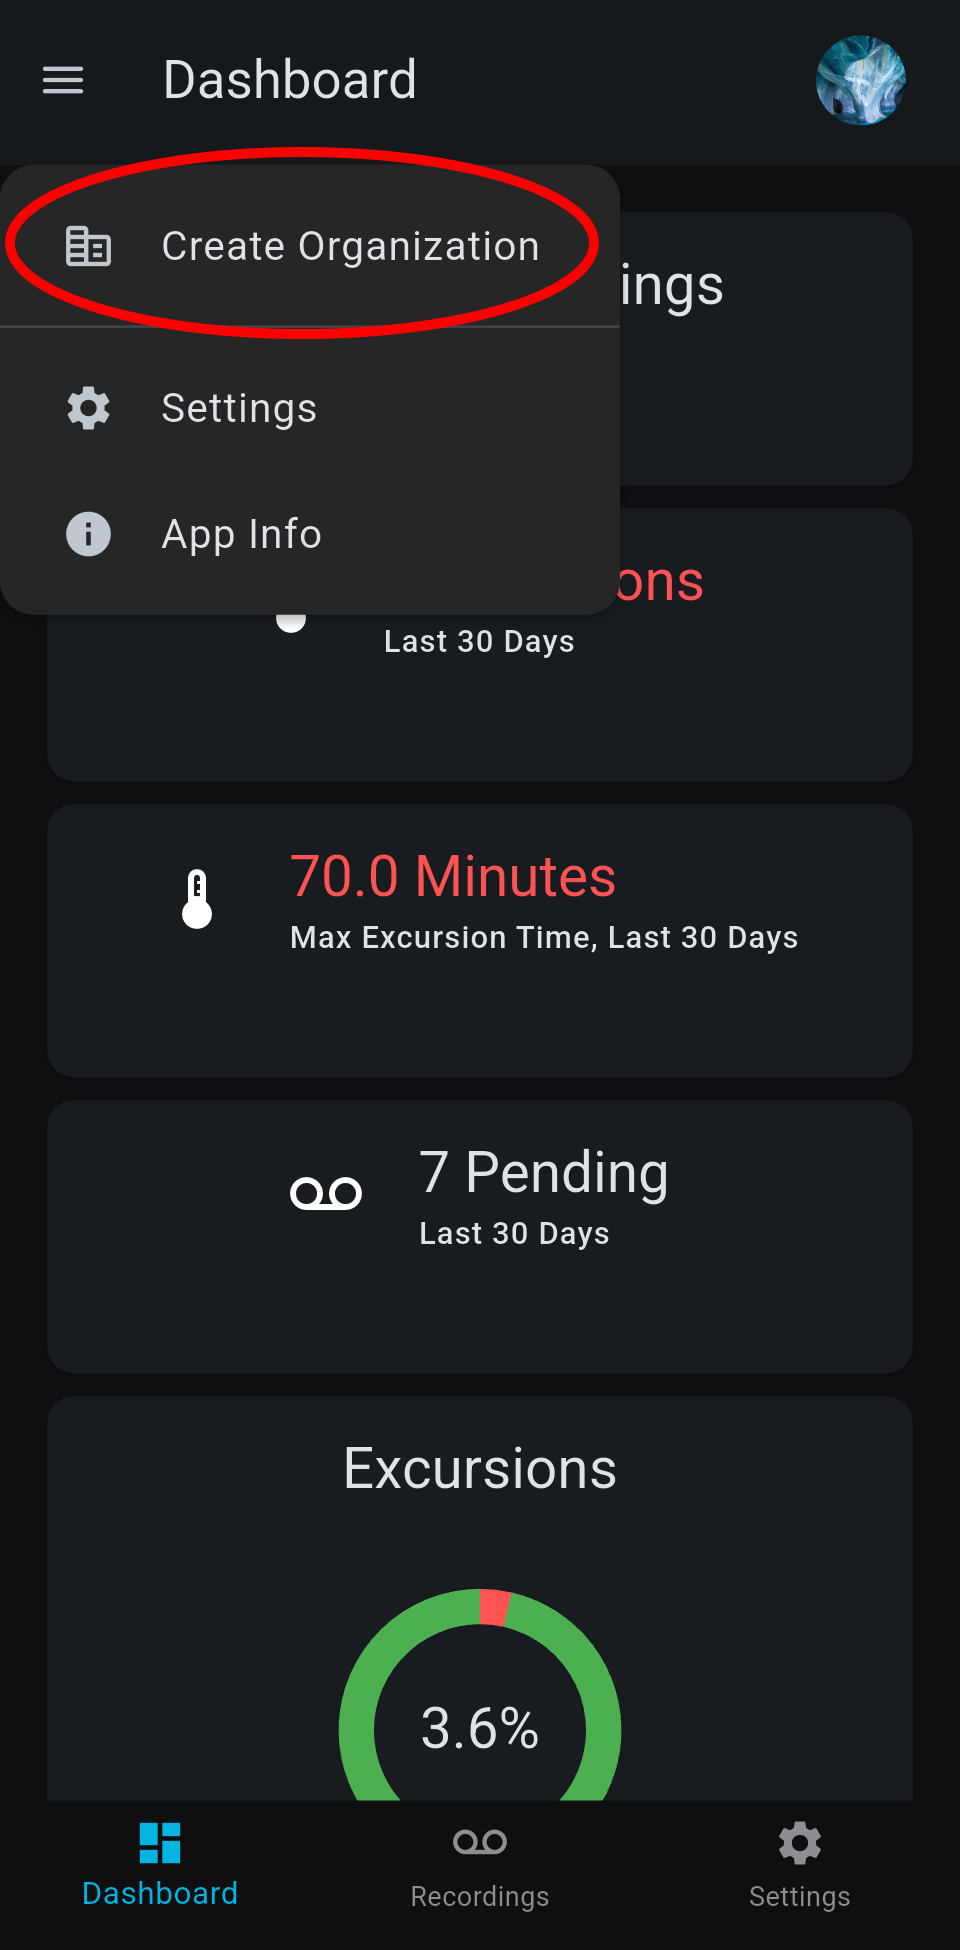
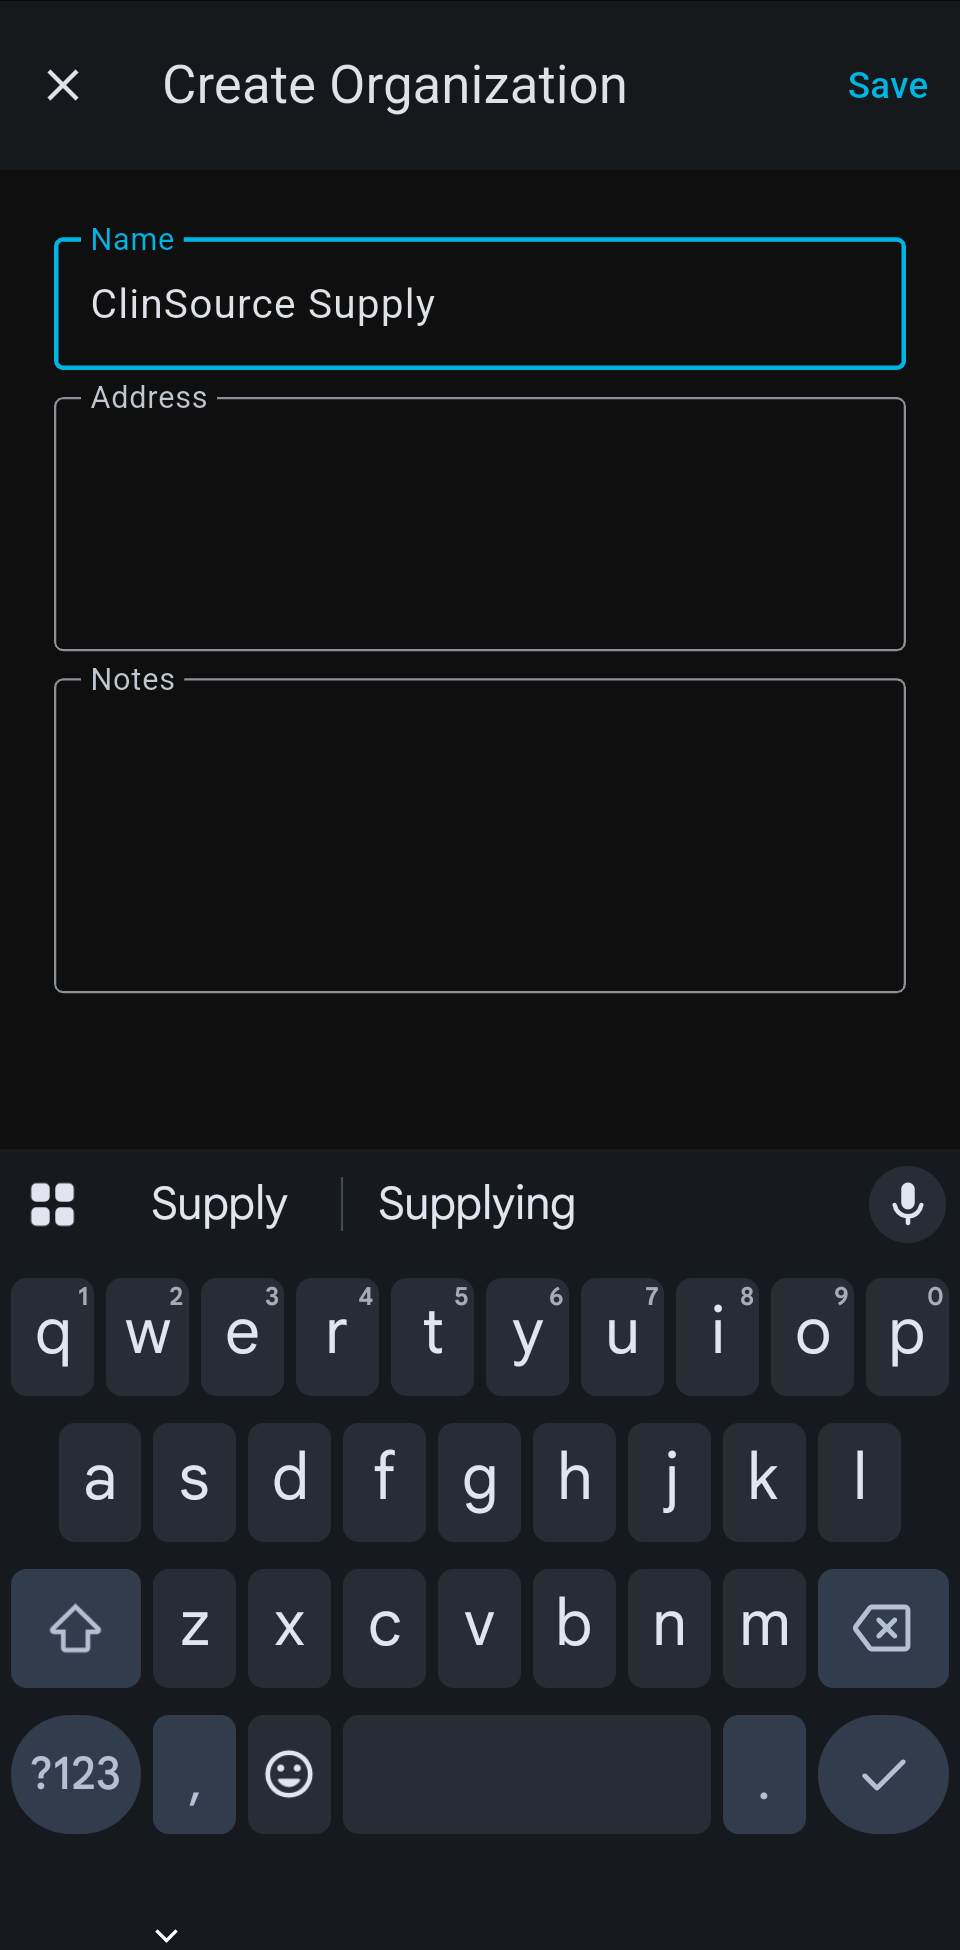
Any verified user can create an organization. Simply tap the "hamburger" menu in the top-left corner, and select "Create organization". A dialog will appear, where you can fill in the organization's name, address, and any notes that you want to keep.
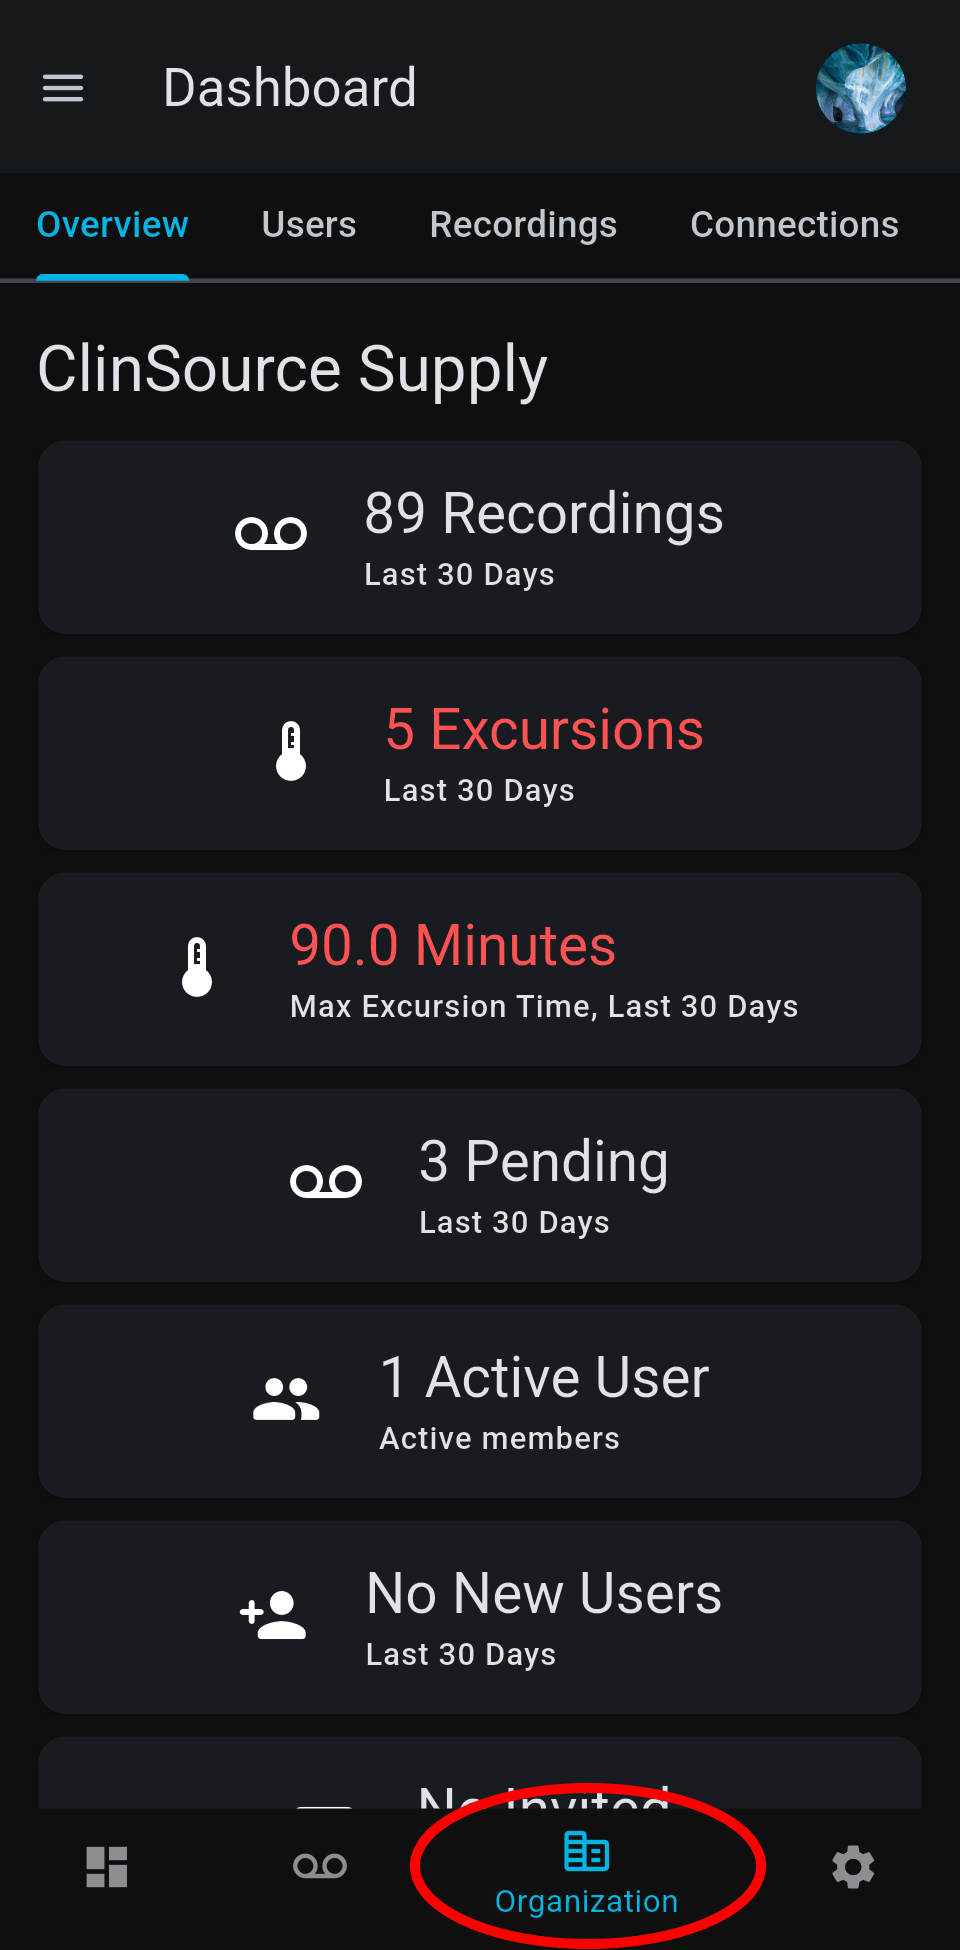
After creating the organization, you will automatically become the owner, and have full admin privileges. An "Organization" tab will appear at the bottom of the screen (or on the left on a desktop) and you will be able to see all of the information related to the organization.
Of course, the value of organizations is to improve communication and traceability among users, and for that you'll need to add other users to your organization.
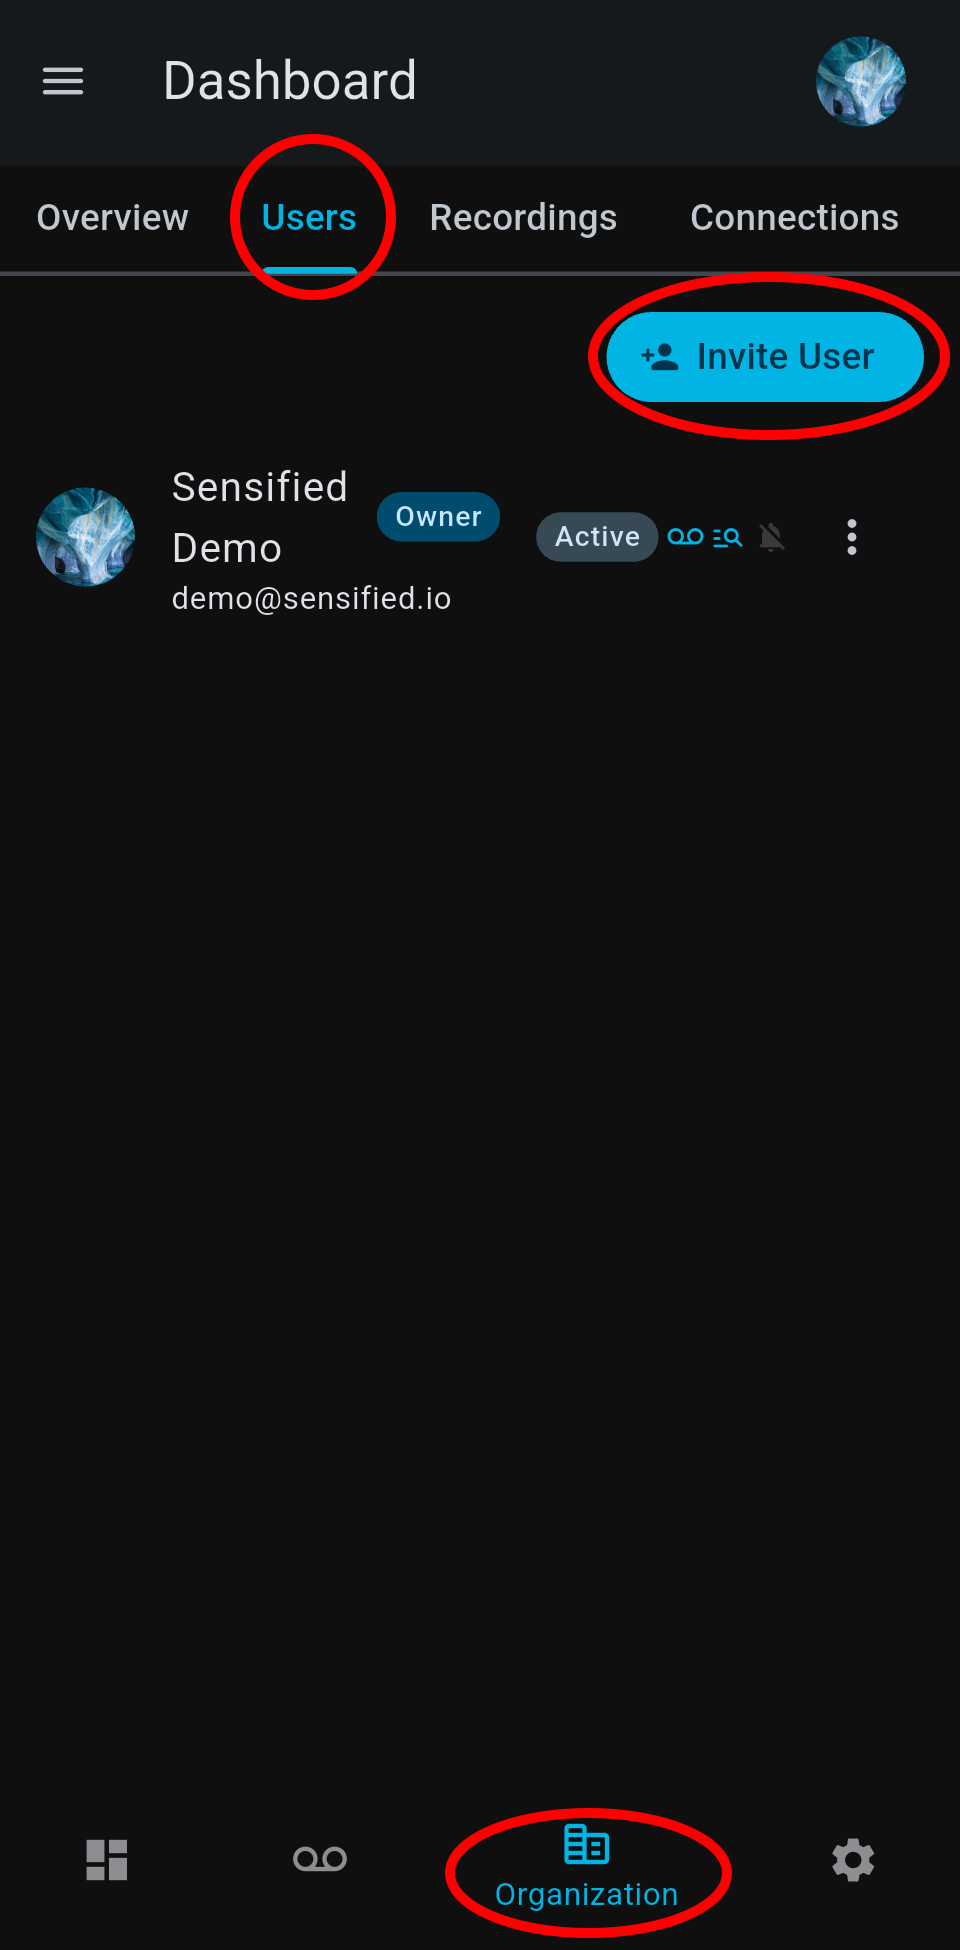
After creating the organization, go to the Users tab within the organization view. You'll see one user already, you. Note that there is a chip noting that you're the owner. Click the "Invite User" button.
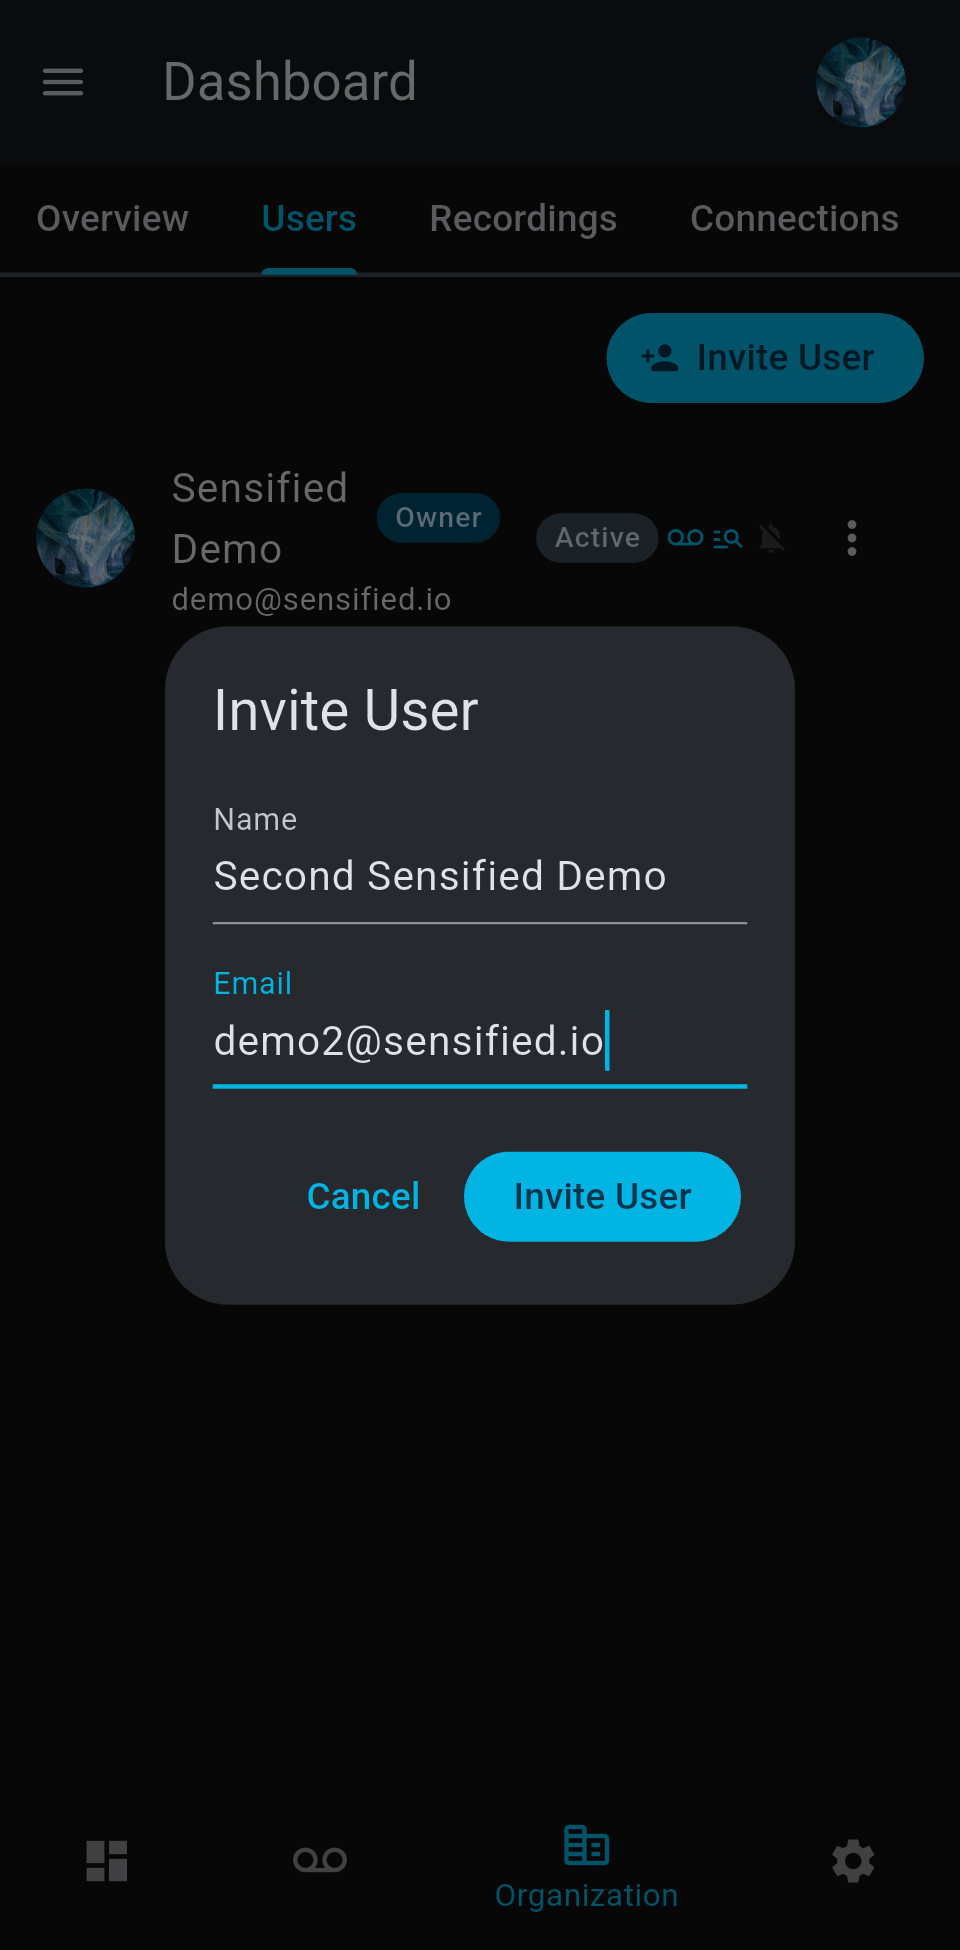
A dialog will appear, prompting you to enter the user's name and email.
Note that the user can either be a new login, or one that already exists on the Seguro platform. The only restriction is that if the user is already in the Seguro system, they can't already belong to an organization, since currrently, users can only belong to one organizatiion at a time.
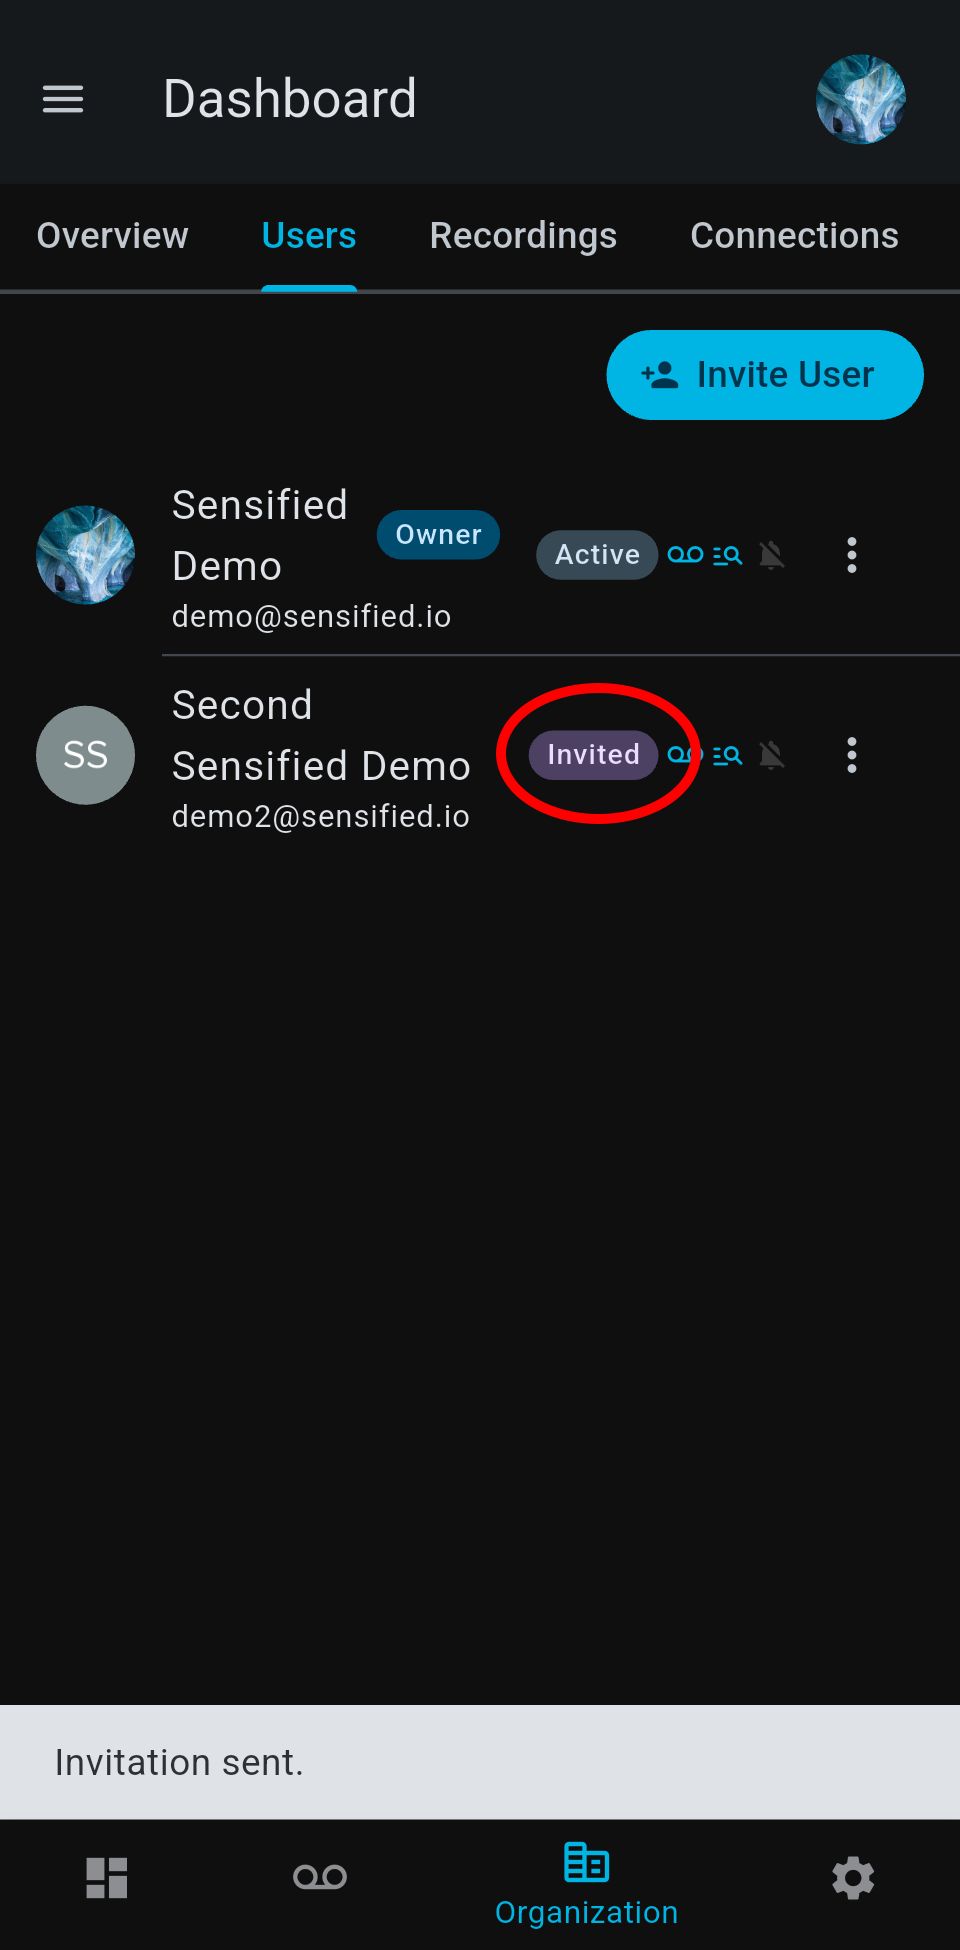
A new entry for the invited user will be added to the user list, with their status set to "Invited". The invited user will receive an email asking them to either set their password and login (for new users) or log in and approve the join (for existing users).
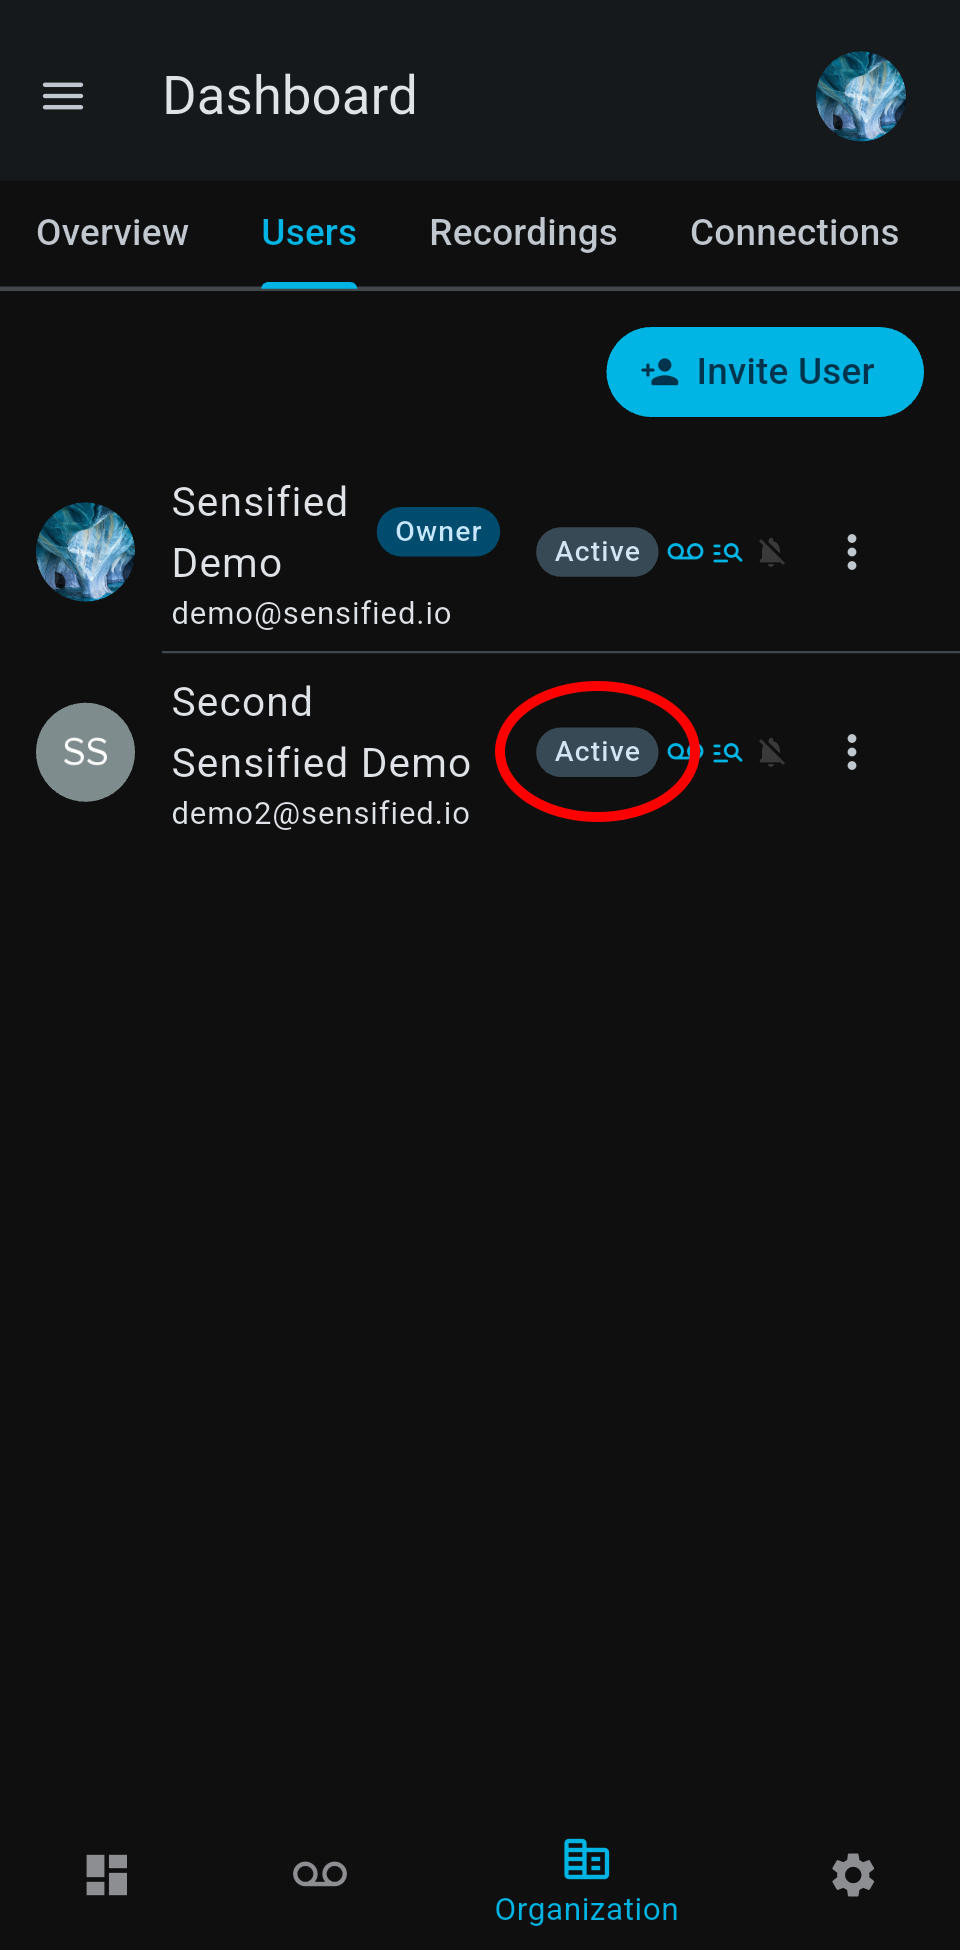
Once the invited user has logged in (and approved the join for existing users) the status in the list of organization users will be "Active".
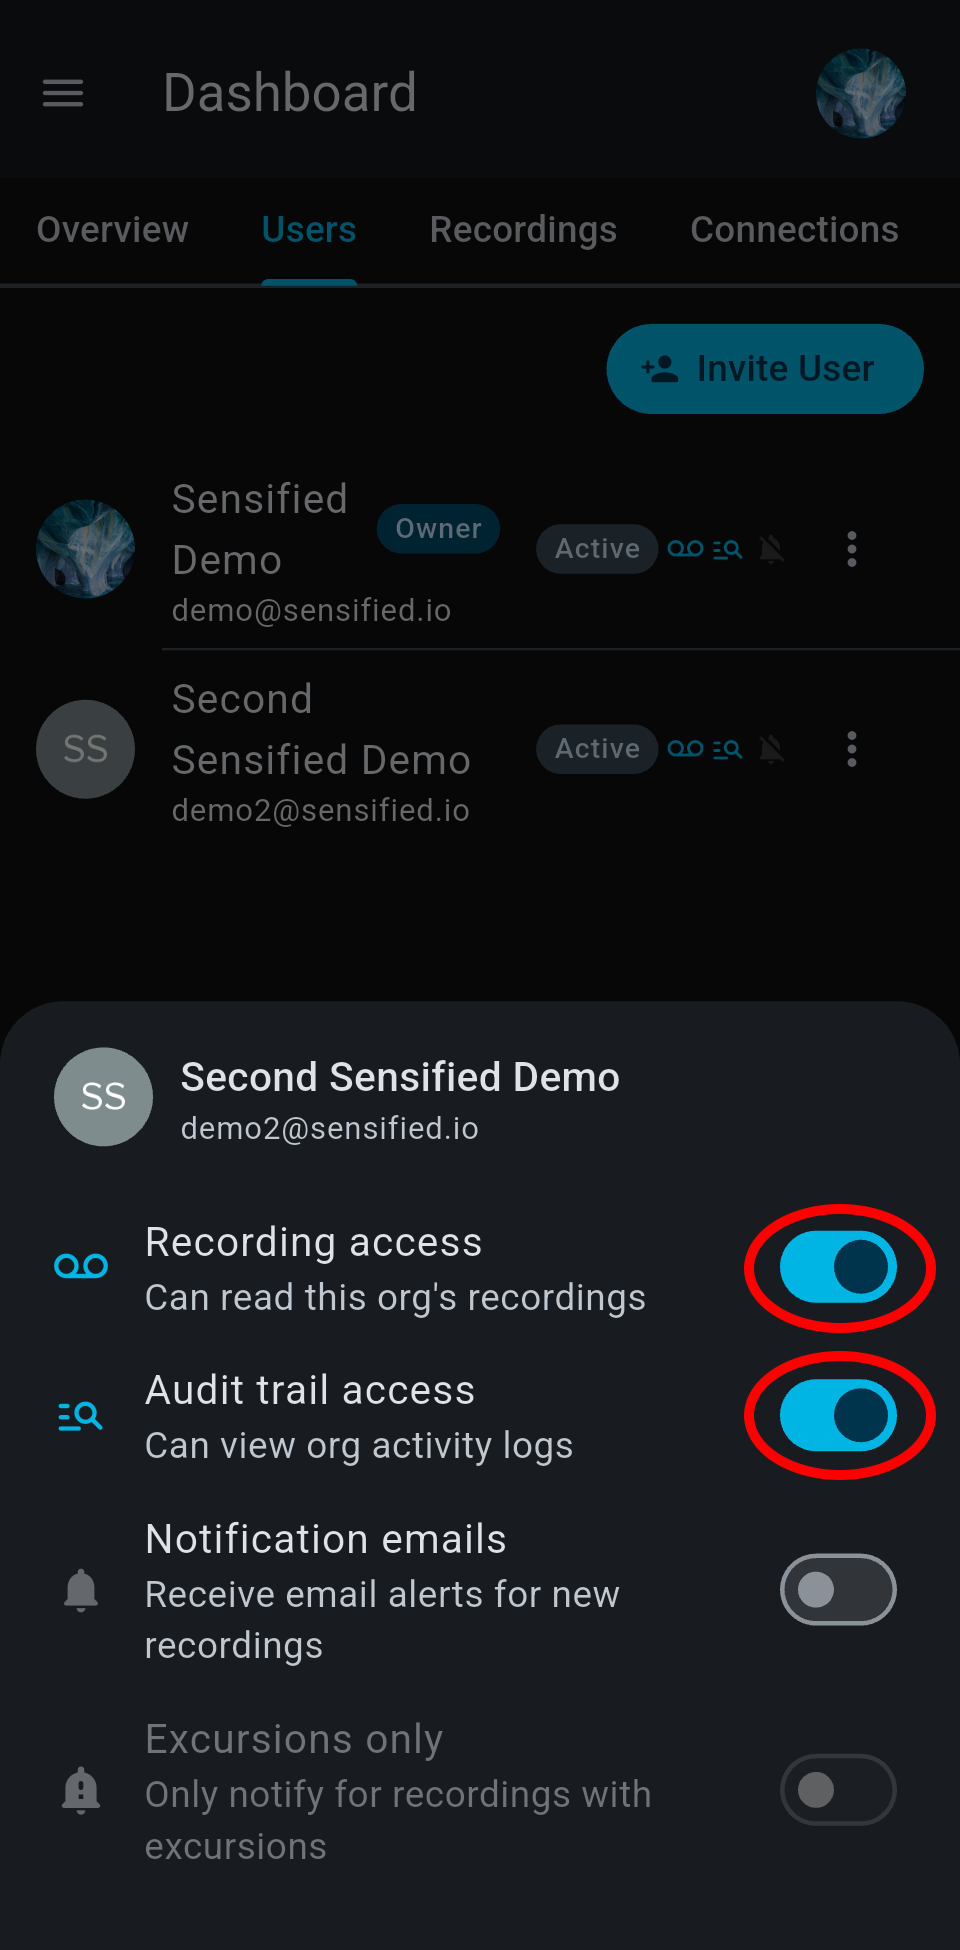
By default, new users have read access to all of the organization's recordings, as well as the organization's audit trail. You can adjust visibility of these for each user by tapping on the user in the organization user list, then adjusting the top two toggles in the options bottom sheet that appears.
You can set up basic workflows in your organization such that certain users are notified of temperature recordings when they are completed.
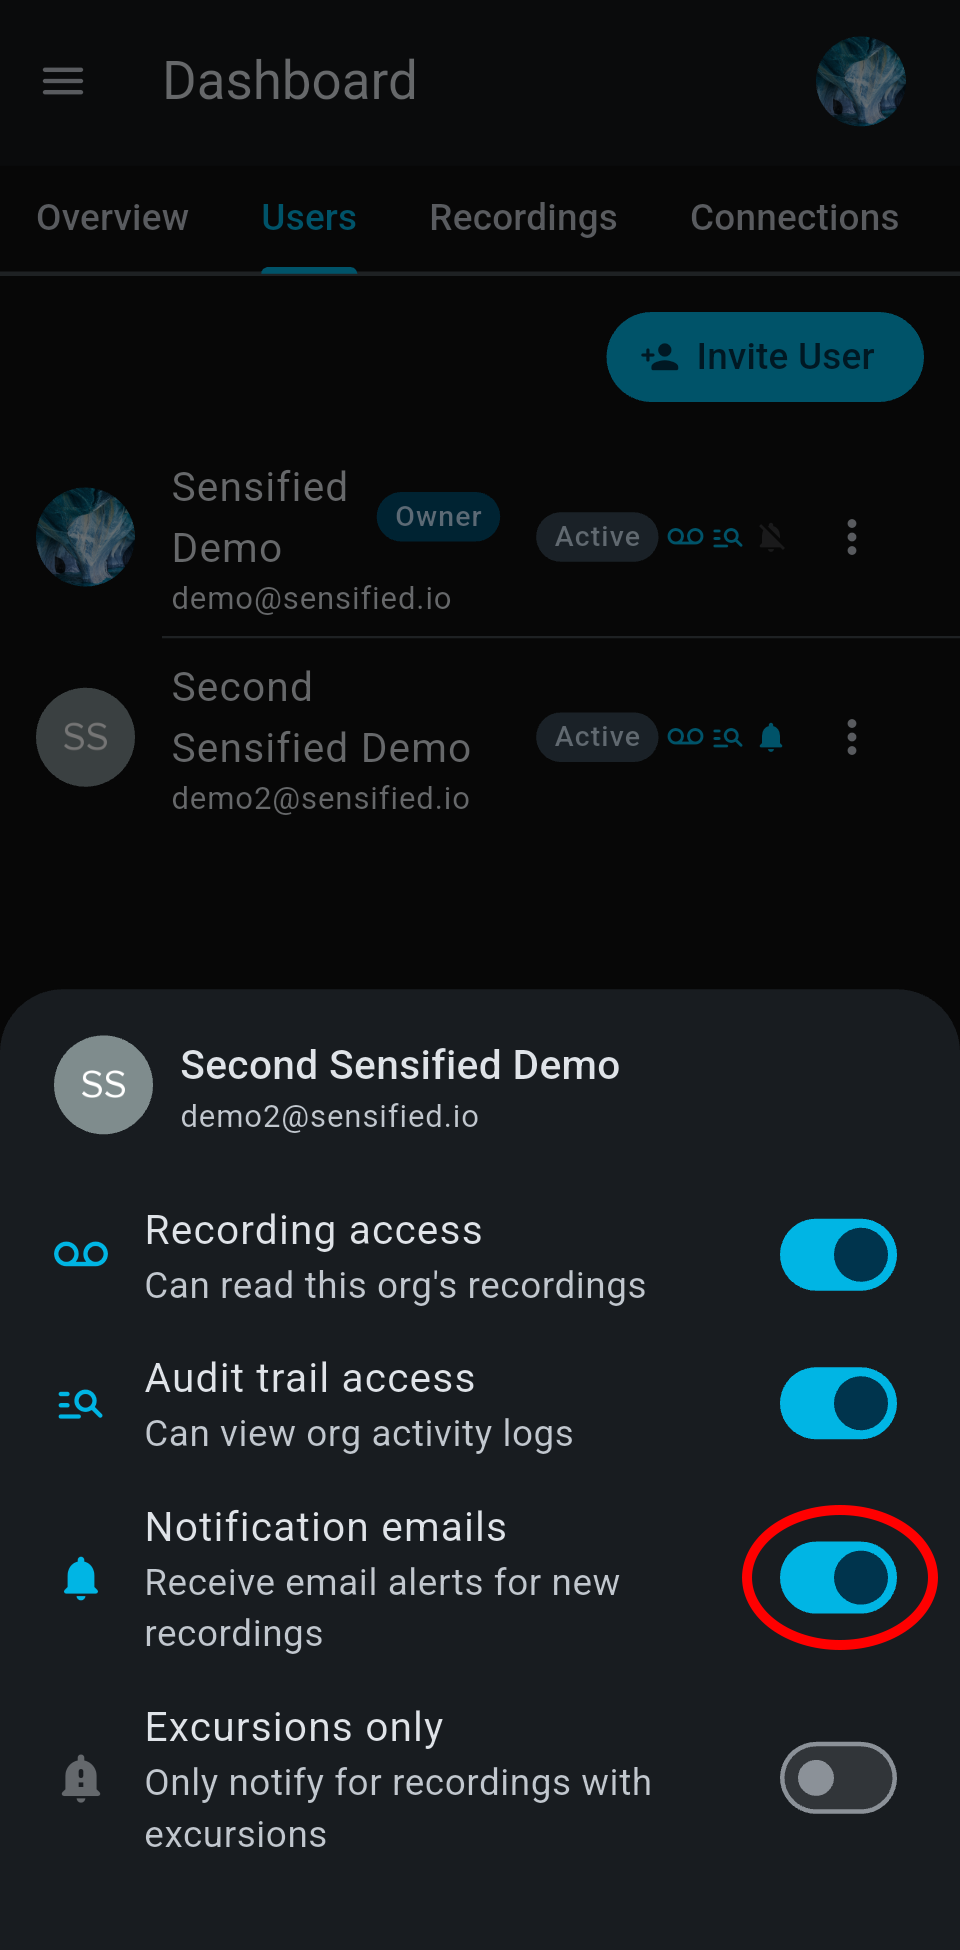
To set up a user for receiving notification emails, go into the organization's user list (Organization → Users), tap the user in the list, and enable the Notification emails toggle.
If you want this user to only receive emails when there is an excursion, then you need to also enable the Excursions only toggle below it.
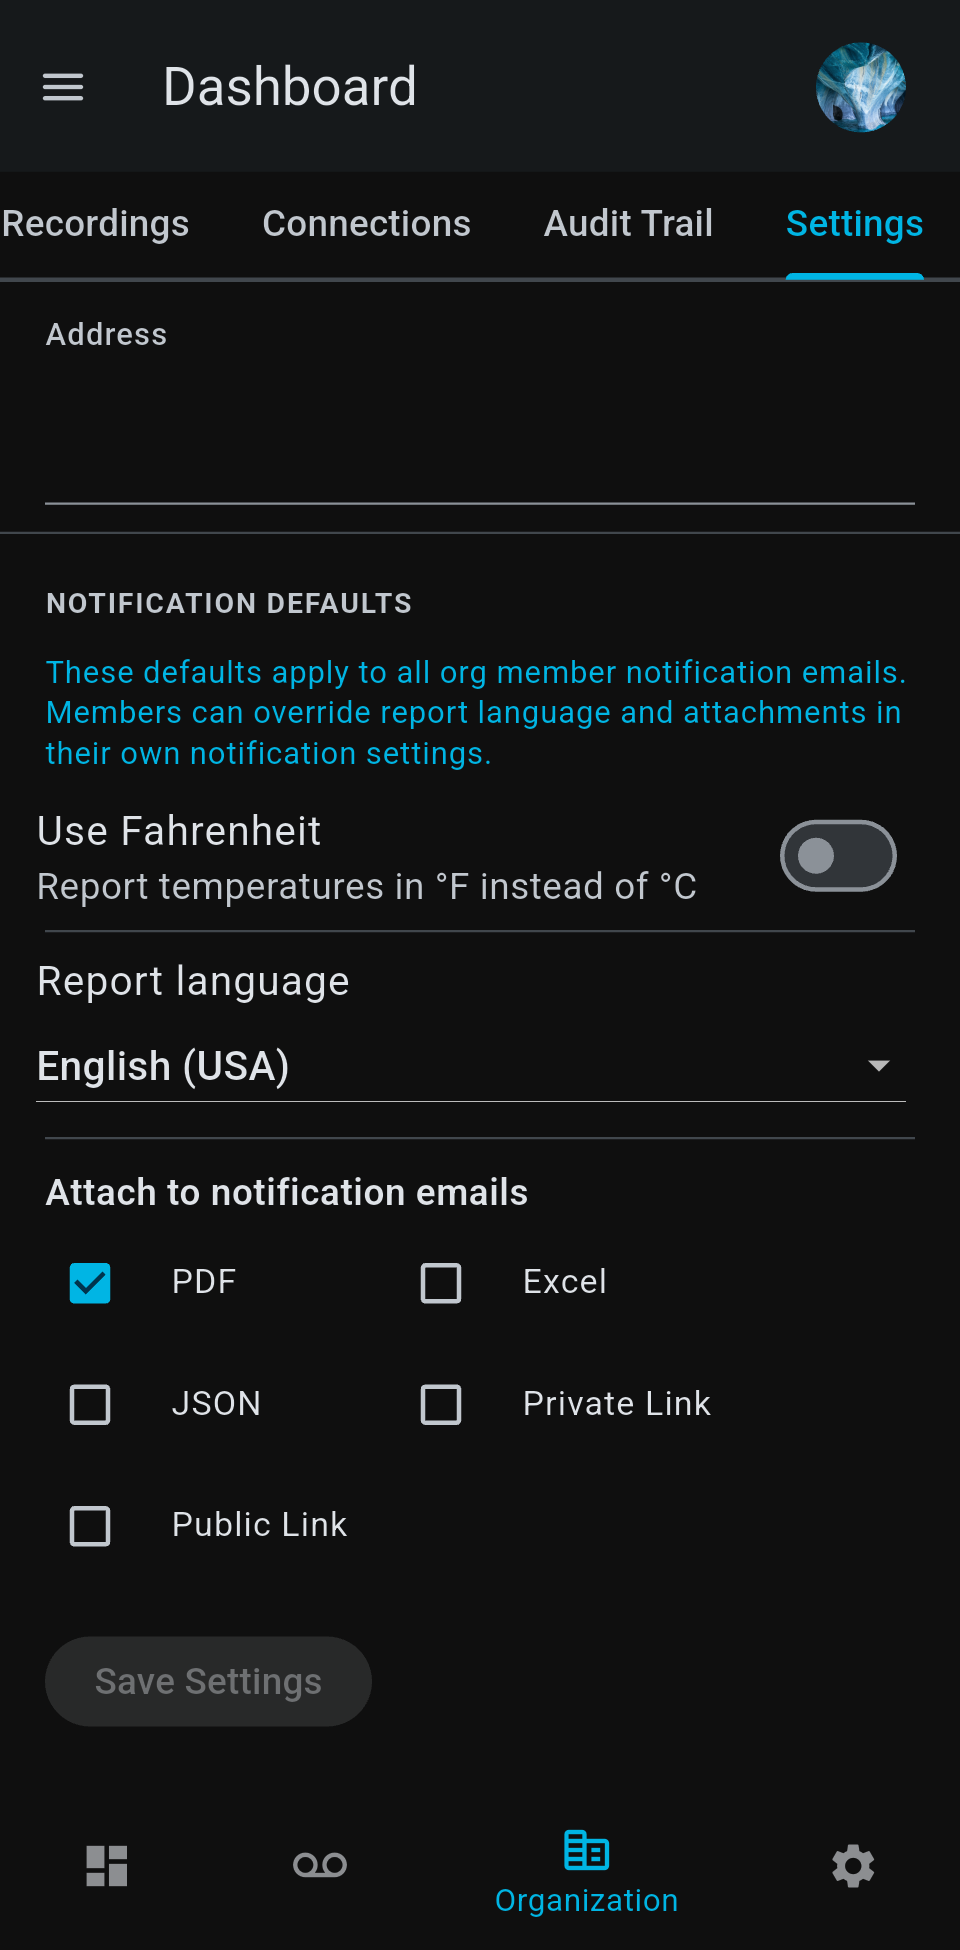
There are also some global settings that apply to every user. If you wish to change the temperature units, language, or contents of all notification emails for the organization, go to settings (Organization → Settings), and scroll to the bottom.
Note the similarity between the global notification settings for the organization, and the personal settings in the user's own settings tab. If a user has notifications set up in their personal settings, and an organization admin has also set them up for org notifications, they will only receive one notification email, and the user's personal settings will take precedent.
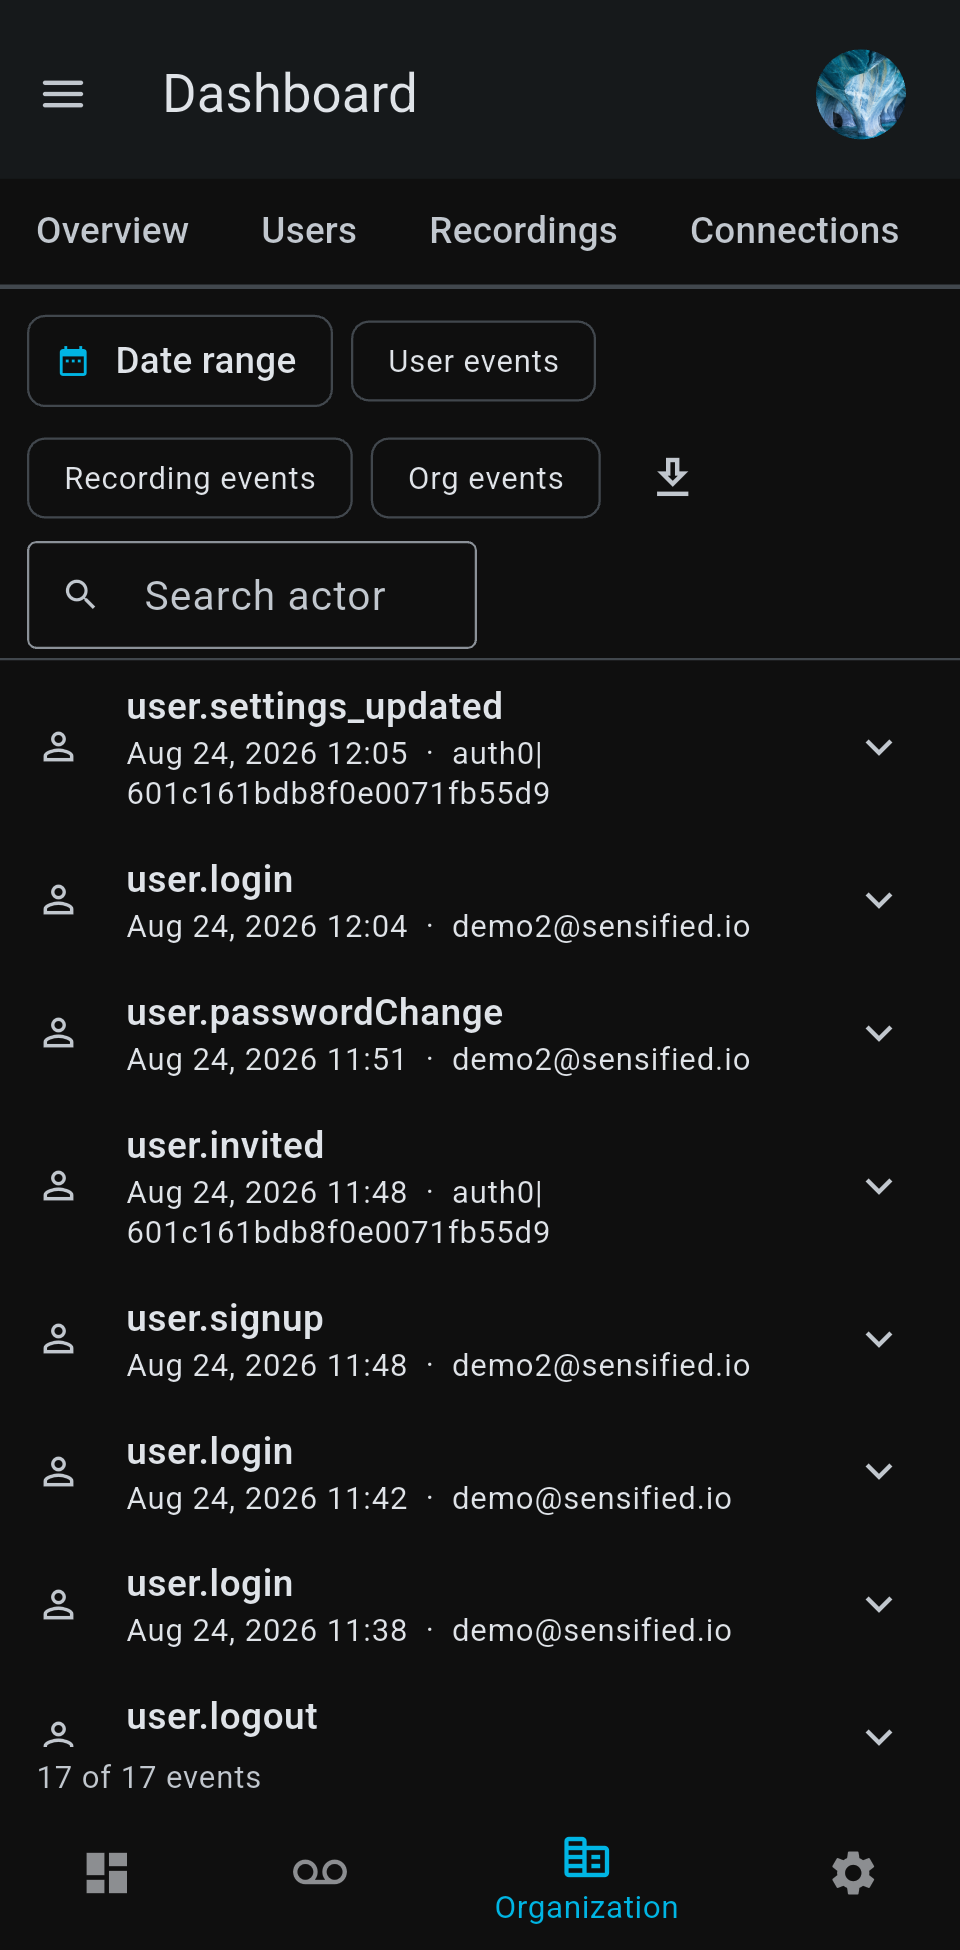
Seguro maintains a full audit trail for all user and organization actions, including recordings.
You can view the audit trail by going to the Audit Trail tab (Organization → Audit Trail). There are filters for action type and date, and you can limit the search to specific date ranges.
You can also export the audit trail to a CSV and download it.
Now that you've mastered the major workflows and explored all the ways you can enrich the recording data with photos, notes, and barcode scans, you're ready to find out more about the details of the Seguro platform.
Seguro temperature reports are created on Sensified's secure servers, not on the tag itself. This allows us to add useful data from the smartphone (like photos) and the Internet (like maps) to the recording record. It also allows us to digitally sign the temperature records, much like legal documents are digitally signed in many industries.
Digital signatures are proof that:
Note that only the PDF file is digitally signed. Excel files and JSON files do not have a mechanism that supports digital signatures.
For simplicity, we're going to use the snapshot recording capability in this exercise.
Tap the tag with your phone. Remember to unlock the phone first. Make sure the screen shows STANDBY at the top.
Tap the grey "Snapshot" button at the bottom-right corner of the screen.
Save the snapshot recording by tapping the blue "Capture" button in the bottom-left corner of the screen.
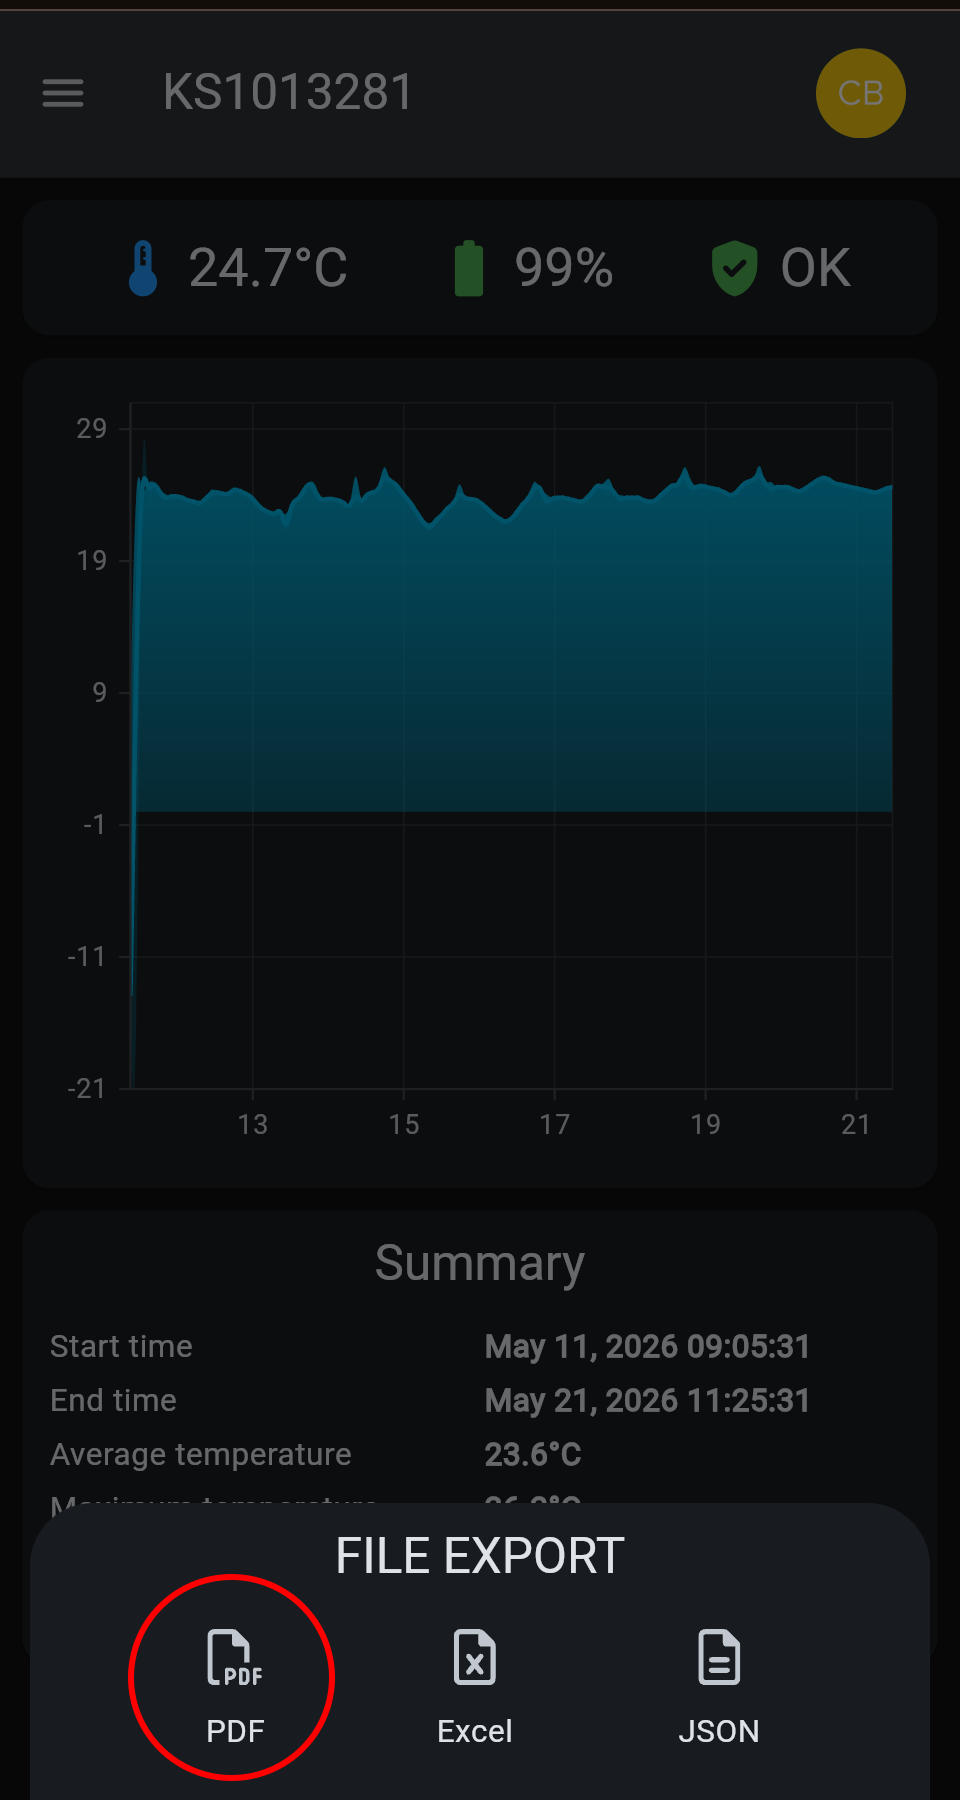
You'll see the recording view, including the attached barcode scans. If you tap the blue export button in the bottom-right corner of the screen, you'll see options for PDF, Excel, or JSON files. Tap the PDF icon to download a PDF recording record.
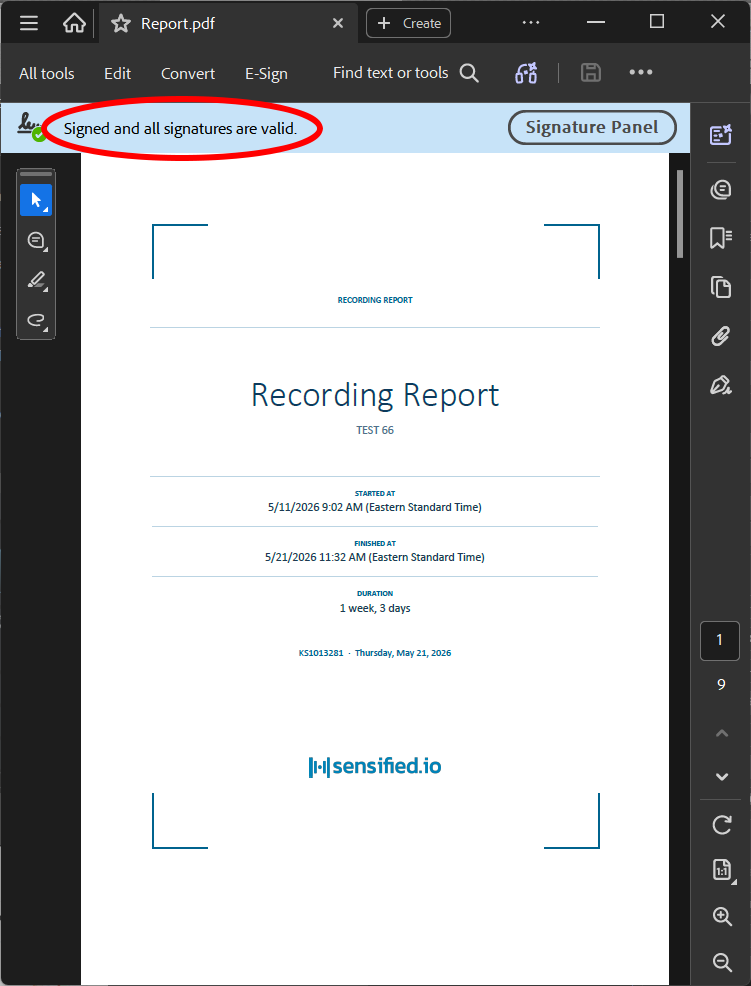
When you open the PDF file using a full-featured PDF viewer like Adobe Acrobat, you'll see the digital signature banner displayed at the top.
Each Seguro temperature monitor comes with a calibration certificate, which describes the details of the validation that was performed to assure that the temperatures reported by the device are within acceptable ranges.
Calibration certificates are stored on the Sensified secure servers, and, like the recording reports, are digitally signed to assure authenticity.
Calibration certificates can be obtained in three ways:
1.
Via a link provided in the recording report.
In the PDF recording report, the device information section is on the last page. The calibration certificate number, as well as the link to the certificate itself, is the last item. Click on the link, and the certificate will be displayed.
2.
Directly, using a public link.
The link can also be used directly, by typing it in the address bar of your browser. Type https://certificates.sensified.io/calibration/AA1234567, where AA1234567 is the serial number of the tag.
3.
Via the Seguro app, after tapping the tag.
Aftertapping the tag with your phone, the standby or recording screen will be displayed. Tap the "hamburger" menu icon in the top-left corner next to the serial number to see the menu. Near the top you'll see the "Device info" menu item. Tap this to show various information on the device, such as hardware and firmware version. The calibration certificate information will be shown at the top, including a button to download the certificate itself.